


A Pro's Guide to Using an Airless Sprayer for a Perfect Finish
- Feb 4
- 17 min read
If you want a high-quality finish with serious speed and efficiency, the airless sprayer is the only way to go. This tool atomizes paint under intense pressure, letting you cover huge surfaces like walls, ceilings, and exterior siding way faster than you ever could with a roller or brush.
Your Guide to a Flawless Sprayed Finish
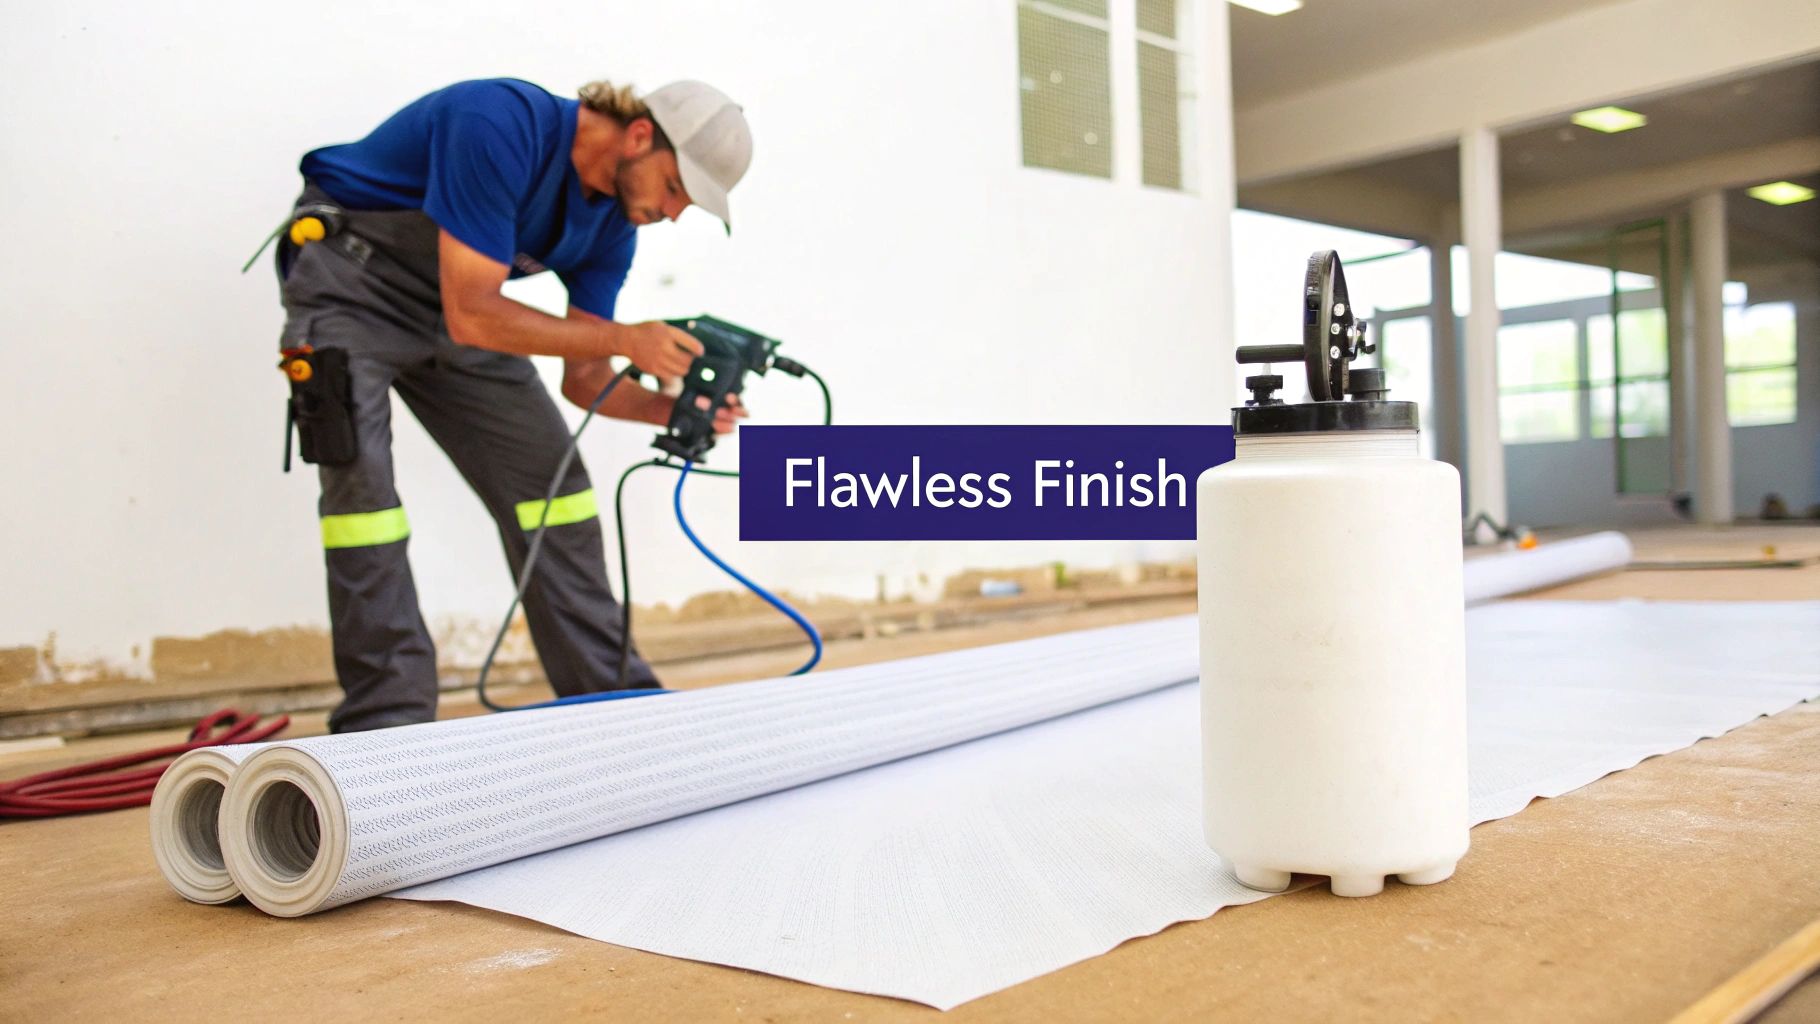
Welcome to the definitive guide on mastering the airless sprayer, brought to you by the crew here at Contractor's Maintenance Service. Forget the usual frustrations and guesswork. This is your road map to a professional finish on every single job.
We'll break down everything—from the initial prep work to the final cleanup—and share practical insights we've picked up from years of servicing Graco, Wagner, and Titan sprayers for contractors all over San Luis Obispo County.
It's no surprise that pros everywhere rely on these machines. The global market for airless paint sprayers was valued at around $1.19 billion, and that number is only climbing, pushed by a booming construction industry. This just goes to show that these sprayers are the go-to choice when both speed and quality are on the line.
Serving San Luis Obispo and Surrounding Areas
Whether you're spraying a commercial building in Atascadero or coating equipment down in Santa Maria, getting your airless sprayer technique dialed in is key to staying efficient. Our team at Contractor's Maintenance Service provides expert repair and support to pros throughout San Luis Obispo County. We are proud to serve the following cities and their surrounding communities:
San Luis Obispo
Paso Robles
Arroyo Grande
Atascadero
Grover Beach
Morro Bay
Pismo Beach
Templeton
Nipomo
Los Osos
Santa Maria
Achieving a flawless finish also means thinking about the different surfaces you'll encounter, like the unique maintenance needs of hardscape and outdoor structures.
This guide kicks off by covering the essential gear and surface prep that truly set the stage for success. Properly preparing your equipment and workspace is the first step toward a smooth, productive day. For more in-depth advice on choosing your rig, check out our guide on https://www.contractorsmaintenanceservice.com/post/finding-the-best-airless-paint-sprayer-for-contractors.
Essential Prep Work and Safety Protocols

A professional-grade finish doesn't just happen when you pull the trigger. The real secret to a flawless, durable result is rooted in meticulous prep work and a serious commitment to safety. Trust me, skipping these early steps is the fastest way to a botched job and a lot of wasted material.
Think of it like building a house—if the foundation is weak, the whole structure is compromised. The same logic applies to using an airless sprayer. The time you put in upfront protecting yourself, the job site, and the surface will pay you back tenfold in the final quality of your work.
Your Personal Protective Equipment Checklist
An airless sprayer turns coatings into a fine mist that hangs in the air, ready to be inhaled or absorbed. This isn't just paint; it's a cocktail of solvents and chemicals that you have to respect. Your personal protective equipment (PPE) is your first and most important line of defense.
Before you even think about plugging that sprayer in, make sure you've got these essentials ready to go:
Respirator: A half-mask respirator with the right cartridges for paint vapors is non-negotiable. It’s what stands between harmful fumes and your lungs, preventing some serious long-term health problems.
Safety Glasses or Goggles: This one’s a no-brainer. You need to protect your eyes from overspray and accidental splashes. High-pressure injection injuries are a real and serious risk, and good eye protection can prevent a trip to the ER.
Gloves: A good pair of chemical-resistant gloves will keep paints and cleaning solvents off your skin.
Coveralls: Whether disposable or reusable, coveralls are a must for keeping paint off your skin and clothes, especially when you're doing a lot of overhead spraying.
Securing the Job Site
Once you’re geared up, it's time to protect the work area. Overspray can travel a surprising distance, settling like a fine dust on everything it touches. Proper masking and draping are critical, whether you're working on a commercial storefront in Paso Robles or a big industrial facility in Santa Maria.
Start by moving all furniture, fixtures, and hardware out of the area. Anything that can't be moved—like windows, doors, and trim—needs to be covered with painter's tape and plastic or paper masking to get those clean, sharp lines. Use durable drop cloths for larger surfaces like floors and any remaining furniture.
Pro Tip: When you’re masking, take a moment to press down firmly along the edges of your painter's tape. This creates a tight seal that stops paint from bleeding underneath, giving you the crisp, professional lines that clients expect. A little extra time here saves a ton of cleanup later.
Preparing the Surface for a Lasting Finish
With the area protected, all your focus should shift to the surface itself. No amount of spraying skill can make up for a poorly prepped substrate. A clean, properly prepared surface is the key to good paint adhesion and long-term durability.
This process really comes down to a few key actions:
Cleaning: The surface has to be completely free of dirt, grease, and any other grime. A good cleaner like Trisodium Phosphate (TSP) or a degreaser usually does the trick. Just be sure to rinse it thoroughly with clean water and let it dry completely.
Sanding: Scuff sanding creates a microscopic profile that helps the new coating grab onto the surface. If you're painting over an old finish, focus on smoothing out any imperfections and dulling glossy areas. Always wipe away the sanding dust with a tack cloth or a damp rag afterward.
Priming: Don't skip the primer. A high-quality primer seals the surface, blocks stains, and creates a uniform base so your topcoat has consistent color and sheen. This is absolutely vital on new drywall or if you’re making a drastic color change.
Whether you need sprayer service in San Luis Obispo or parts in Arroyo Grande, our team at Contractor's Maintenance Service is here to help. Getting these prep stages right is what allows your equipment to deliver the exceptional results it was built for.
How to Set Up Your Sprayer for Peak Performance
Your airless sprayer’s performance lives and dies by its setup. This isn't just about screwing parts together; it's the crucial stage where you dial in the machine for the specific coating you're using. A proper setup transforms your sprayer from a blunt instrument into a precision tool, guaranteeing a consistent, high-quality finish while cutting down on wasted material and time.
Getting this right from the start saves a ton of frustration on the job. Let’s walk through the whole process, from connecting your hose and gun to priming the pump and finding that sweet spot for your pressure.
Assembling Your Core Components
First things first, let’s get the main components connected. Your sprayer comes with a high-pressure fluid hose that needs to be attached securely to the pump's fluid outlet. This is a two-wrench job—use one to hold the outlet fitting steady and the other to tighten the hose. This gives you a leak-proof seal without cranking down so hard you damage the threads.
Next, attach your spray gun to the other end of the hose, again using two wrenches to get a snug, secure fit. Here’s a pro tip: before you put on your spray tip and guard, flush the hose with a compatible solvent. If you're using latex paint, just run some water through it. This simple step clears out any factory dust or gunk left over from your last job and can save you from a world of clogs later.
At the heart of every airless sprayer is its power source—a tough motor driving a fluid section. Getting a basic feel for the pump mechanism helps immensely with both setup and troubleshooting down the line. It's the pump that does the heavy lifting, creating the intense pressure needed to atomize coatings without any compressed air.
Demystifying Spray Tip Selection
Choosing the right spray tip is probably the single most important decision you'll make during setup. The tip dictates two critical things: the width of your spray fan and how much material flows through the gun. You can't just grab any tip and hope for the best; the right one is completely dependent on the material you're spraying and the surface you're coating.
Spray tips are easy to decode once you know the system. They have a three-digit number, like 517. Here’s what it means:
The First Digit (5): Double this number to find the fan width in inches when you’re spraying from about 12 inches away. In this case, a '5' gives you a 10-inch spray fan.
The Last Two Digits (17): This is the size of the hole, or orifice, in thousandths of an inch. For our example, that's .017". Thinner materials like stains need a smaller orifice, while thicker coatings like latex paint demand a larger one.
A classic rookie mistake is trying to push a worn-out tip for too long. A worn tip doesn't just spray a narrower fan; it gives you less control, wastes paint, and leaves an uneven finish. For pros working in places like Paso Robles or Templeton, swapping out tips regularly is a tiny investment that pays huge dividends in quality and speed.
To help you get started, we've put together a quick reference table. This chart will help you match the right spray tip orifice size to the coating you're applying.
Spray Tip Selection Guide for Common Materials
Material Type | Typical Orifice Size (Inches) | Recommended Usage |
|---|---|---|
Stains & Lacquers | .009" - .013" | Fences, decks, cabinetry |
Enamels & Oil-Based | .013" - .015" | Trim, doors, metal surfaces |
Latex Paint (Interior) | .015" - .019" | Walls, ceilings, drywall |
Elastomerics | .025" - .035" | Stucco, masonry, block filler |
Remember, this is a starting point. Always check the paint can—the manufacturer usually recommends a specific orifice size range.
Priming the Pump and Setting the Pressure
Before you can even think about spraying, you have to prime the pump. This step is all about getting the air out of the system. Air in your lines is the enemy; it will cause your sprayer to spit and sputter, which will absolutely ruin your finish. The process is straightforward and involves using the prime valve to circulate fluid and push out any trapped air.
Once the pump is primed and filled with paint, it's time to set the pressure. Your goal is to find the lowest possible pressure that still fully atomizes the material. Don't just crank it to the max.
Start with the pressure control set low and do a quick test spray on some scrap cardboard. If you see distinct lines at the top and bottom of your spray pattern—an effect called "tailing" or "fingers"—your pressure is too low. Turn it up a little at a time, testing after each adjustment, until those tails vanish and you're left with a soft, even spray pattern. Pushing too much pressure just creates a cloud of overspray, wastes paint, and wears out your tips faster. Nailing this part of the setup is a key skill when it comes to using an airless sprayer like a pro.
Mastering Your Spray Technique
Alright, your sprayer is set up and dialed in. Now comes the part where skill really makes the difference: your technique. This is what separates a flawless, professional finish from a messy, amateur-looking job.
It’s all about consistent, deliberate motion. Forget about speed; focus on being smooth and methodical. Once you nail the fundamentals, you'll say goodbye to drips, runs, and uneven coverage for good.
This diagram walks you through the essential pre-spray workflow, from picking your tip to priming the system and setting the pressure.
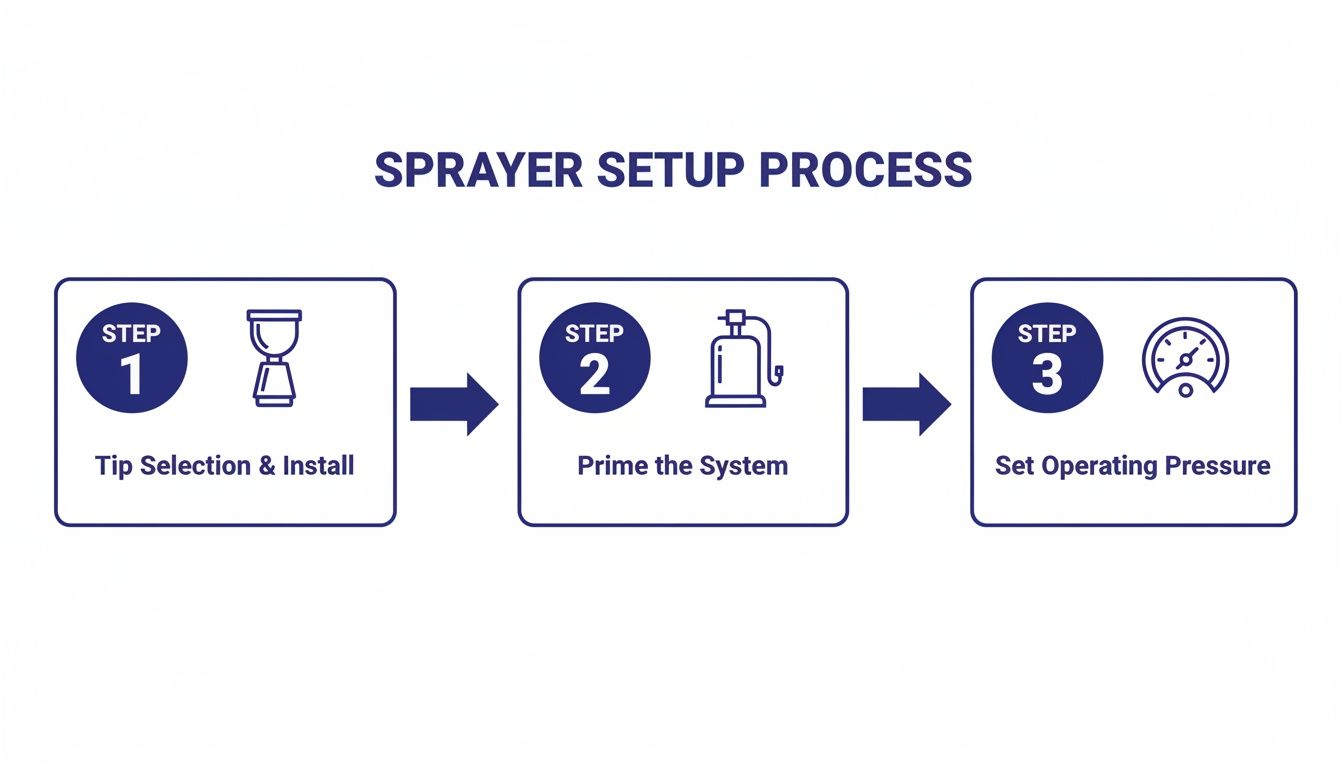
Following this sequence makes sure your equipment is perfectly calibrated before a single drop of paint hits the wall.
Maintaining the Right Distance and Angle
The first two rules of spraying are non-negotiable: keep a consistent distance from the surface and hold the gun perfectly perpendicular. Every spray gun has a "sweet spot" for atomization, and you need to stay in it.
For most paints and surfaces, that magic distance is between 10 to 12 inches away. Get too close, and you'll dump too much paint on at once, causing runs and sags. Stand too far back, and the paint starts to dry mid-air, leaving you with a rough, sandy texture and a cloud of overspray.
Your angle is just as critical. Keep the gun aimed straight at the surface—not tilted up, down, or sideways. Angling the gun creates an uneven spray fan, laying down a heavy coat on one edge and a thin one on the other. The result? Obvious stripes and an inconsistent sheen.
The Correct Spraying Motion
A perfect finish is born from a smooth, controlled motion. This is where most beginners go wrong: they pivot their wrist instead of moving their entire arm.
Move Your Arm, Not Your Wrist: Lock your wrist and sweep your whole arm parallel to the surface. This is the only way to maintain that perfect 10-12 inch distance and 90-degree angle from start to finish. Fanning the gun by flexing your wrist creates an arc, which guarantees an uneven coat.
Start Moving Before You Spray: Here's a pro tip. Always get your arm moving before you pull the trigger, and keep it moving after you let go. This technique prevents those heavy blotches of paint that can form at the beginning and end of each pass.
Whether you're a contractor in San Luis Obispo spraying a new custom home or a crew in Morro Bay recoating a commercial exterior, this disciplined motion is the secret to efficiency. It makes every pass count, cutting down on back-rolling and touch-ups later.
Overlapping for a Seamless Coat
The final piece of the puzzle is the overlap. To create a uniform coat without any visible lines, you need to overlap each spray pass by 50%.
It's simple in practice: aim the bottom of your new spray fan directly over the top edge of the pass you just laid down. This systematic approach ensures every square inch of the surface gets an even amount of paint, blending each pass seamlessly into the next.
For pros working on big jobs, from industrial facilities in Santa Maria to new developments in Templeton, this 50% overlap rule is what ensures a consistent mil thickness and a top-tier finish across huge surfaces. For more on how tips influence this, you can learn more about choosing the right tip size for airless sprayer finishes in our article.
Tackling Tricky Surfaces
Of course, not everything is a big, flat wall. You'll need to adapt your technique for more complex jobs.
Edges and Corners: When spraying a room, always hit the corners first. Spray a single vertical pass right into the corner, coating both sides at once. After that, you can work your way out from the corner with your standard horizontal passes.
Railings and Spindles: For intricate stuff like railings, spray one side completely before moving to the other. A smaller spray fan will help minimize overspray and keep the paint exactly where you want it.
Cabinetry: When spraying cabinet doors, tackle the inside edges first. Then, move on to the flat surfaces, always keeping the gun moving to avoid paint buildup on the detailed profiles.
Mastering these core techniques transforms spraying from a guessing game into a repeatable process. It's how you'll get that perfect finish, every single time.
Troubleshooting Sprayer Issues in the Field
Even when you’ve done everything right, equipment can—and will—act up on the job. The real test for a pro is how quickly you can diagnose the problem and get back to work. Nothing kills momentum like a sprayer that suddenly decides it's done for the day.
This is your go-to guide for figuring out what’s wrong with your airless sprayer and fixing it fast. We’ll cover the most common headaches, from wonky spray patterns to frustrating clogs, so you can solve the problem and keep the project moving.
Diagnosing an Inconsistent Spray Pattern
One of the first things to go wrong is the spray pattern. You're expecting a nice, even fan with soft, feathered edges, but instead, you're getting "fingers" or "tails"—those hard lines at the top and bottom of the spray. It’s a classic sign that something’s off.
Nine times out of ten, this points to one of two things:
The pressure is too low. Your pump isn't working hard enough to atomize the paint properly. This should always be your first check.
Your tip is worn or the wrong size. An old, worn-out tip just can't produce a clean fan. Using a tip that’s too big for your material will also give you the same frustrating result.
The fix is usually simple. Start by dialing up the pressure, a little at a time. If the tails vanish, problem solved. If you’ve cranked the pressure and the pattern still looks bad, your tip is almost certainly the culprit. Time to swap it for a new one.
Dealing with Frequent Tip Clogs
A tip that clogs every few minutes can bring a productive day to a screeching halt. While a random clog here and there is part of the job, constant clogging means there’s an underlying issue that needs to be addressed. It’s rarely the tip’s fault; it's usually the material going through it.
First, pop open your filters. If the gun or manifold filter is gunked up, it’s not doing its job, and that debris is heading straight for your tip. Give them a good cleaning. Next, and this is a big one, make sure you’re straining your paint. Even a brand-new pail can have dried flakes or junk in it just waiting to cause a clog.
Don’t underestimate the power of straining your paint. Taking two extra minutes to pour your material through a mesh strainer bag can save you an hour of frustrating clogs in the field. It’s a simple habit that makes a huge difference.
If you're still fighting clogs and inconsistent patterns, this quick guide can help you pinpoint the issue fast.
Airless Sprayer Troubleshooting Quick Guide
Quickly diagnose and resolve common airless sprayer problems with these solutions.
Problem | Potential Cause | Solution |
|---|---|---|
"Fingers" or "Tails" in Spray Pattern | Pressure is too low. | Gradually increase the pressure setting on your sprayer. |
Tip is worn or too large. | Replace the tip with a new one of the correct size. | |
Frequent Tip Clogs | Paint is not strained properly. | Strain all paint through a mesh bag before spraying. |
Manifold or gun filter is dirty. | Clean or replace the filters in your sprayer and gun. | |
No Pressure or Won't Prime | Inlet valve is stuck or dirty. | Tap the inlet housing with a mallet; clean the valve ball. |
Prime/spray valve is clogged. | Clean the valve assembly thoroughly. | |
Sprayer Loses Pressure While Working | Packings are worn out. | This usually requires professional service to replace the packing kit. |
Suction tube has an air leak. | Tighten all connections on the suction tube or replace O-rings. | |
Motor Hums but Won't Start | Low voltage or bad extension cord. | Use a heavy-gauge cord (12-gauge minimum) and plug directly into the outlet. |
Stuck piston or check ball. | This may require a manual release or professional service. |
Remember, regular cleaning and maintenance are the best ways to prevent most of these problems from happening in the first place.
When to Call for Professional Service
Look, you can fix a lot of things right there on the job site. But some problems are signs of a deeper issue, and pushing a malfunctioning sprayer can lead to catastrophic—and expensive—damage. As the authorized service center for Graco, Wagner, and Titan on the Central Coast, we’ve seen it all.
Contractors from San Luis Obispo and Arroyo Grande to Paso Robles and Santa Maria trust us to get their gear running again, fast. It's time to bring your sprayer in for a pro diagnosis if you see any of these red flags:
Persistent Pressure Loss: The pressure suddenly drops and just won't come back up. This often means you’ve got worn packings or a damaged piston rod.
Motor or Engine Trouble: If your electric motor just hums without turning over, or your gas engine keeps stalling under load, something serious is going on inside.
Leaks From the Pump: Any fluid leaking from the main pump housing is a dead giveaway that your internal seals have failed.
Trying to DIY these kinds of major repairs often makes things worse, costing you more in parts and downtime. Our techs have the right tools, genuine parts, and experience to fix it correctly, protecting your investment and getting you back to making money.
Proper Cleanup and Maintenance for Long-Term Reliability
The job isn't over when the last coat is on the wall. For any pro who relies on their sprayer day in and day out, what you do after the job is just as critical as the prep work. This is where diligent cleanup and a solid maintenance routine separate a reliable workhorse from a machine that’s always in the shop.
Skipping this step is the fastest way to kill your sprayer. It's a simple fact. Leftover paint will clog the pump, seize up your valves, and wreck expensive parts for good. A proper shutdown and flush only takes a few minutes, but it can easily add years to the life of your machine and guarantee it's ready to go when you are.
The Essential Flushing Procedure
Flushing the system is non-negotiable. The whole point is to get every last bit of paint out of the pump, hose, gun, and filters before it has a chance to harden into a nightmare. Always match your cleaning fluid to the material you just sprayed.
For water-based coatings (like latex paint): Good old soap and water will do the trick.
For oil-based or solvent-based materials: You'll need a compatible solvent, like mineral spirits or lacquer thinner.
First things first, relieve any pressure in the system. Then, get the suction tube out of your paint and drop it into a bucket of your cleaning fluid. Open the prime valve and let the pump run until the fluid coming out is clear—that's your signal that the pump itself is clean.
Next, flip the prime valve back to the spray position. Take the tip and guard off your gun and trigger it into an empty waste bucket. Keep it going until the fluid running through the hose and gun is completely clear. For a more detailed breakdown, check out our complete guide on how to clean an airless paint sprayer.
Here's the bottom line: Treat cleanup as part of the job, not something to rush through at the end of the day. A thorough cleaning is the single best piece of preventive maintenance you can do for your sprayer.
Long-Term Storage and Service
If you know your sprayer is going to be sitting for more than a few days, you absolutely have to run a storage fluid like Pump Armor through it. This stuff is designed to stop any leftover water or solvent from corroding the internals and keeps your seals lubricated and flexible.
For contractors here on the Central Coast, from San Luis Obispo up to Paso Robles or down in Arroyo Grande, the change of seasons can mean your gear sits idle for a bit. Winterizing your sprayer with a good storage fluid is crucial to prevent damage from freezing temperatures and ensure it fires right up when the busy season hits again. It's a simple step that protects your investment and saves you from a massive repair bill.
Got Questions? We've Got Answers
Even the most seasoned pros run into questions on the job. Over the years at our San Luis Obispo service shop, we've heard just about everything. Here are a few of the most common questions we get from painters and contractors about running an airless sprayer.
Getting these small details dialled in can make a huge difference in your finish quality and how much time and material you spend on a project.
What's the Right Pressure Setting for My Paint?
This is the big one, and the answer is always a balancing act. You're looking for that sweet spot.
Start low. Go with the lowest pressure that still gives you a complete, even spray pattern. You'll know you're too low if you see "tails"—those heavy lines of paint on the top and bottom edges of your spray fan. Most paint cans give you a recommended PSI range, and that's a perfect place to start.
Grab a piece of cardboard and do a test spray. Slowly crank up the pressure just until those tails disappear. Any higher is overkill. Pushing too much pressure just creates a cloud of overspray, wastes paint, and absolutely torches your tips. The goal is to find the minimum pressure needed for a perfect finish.
Can I Use an Extension Cord with My Sprayer?
Yes, but this is one of those things you can't afford to get wrong. You absolutely have to use the right cord.
Always grab a heavy-duty, grounded extension cord that's properly rated for your sprayer's amperage. If the cord is too thin or you're stringing a bunch together, you'll get a voltage drop. That drop can overheat the motor and cause permanent, expensive damage.
Our advice for crews in Atascadero, Santa Maria, and beyond: Keep it short and thick. Use the shortest cord you can get away with, and make sure it’s at least 12-gauge wire. This ensures your rig gets the steady, consistent power it needs to work reliably all day long.
How Do I Unclog a Spray Tip on the Fly?
This used to be a real pain, but modern guns make it a non-issue with reversible tips.
First thing's first: engage the gun's safety lock. Then, just twist the tip 180 degrees around to the "unclog" position.
Point the gun at a piece of scrap (like your cardboard test sheet), and give the trigger a quick squeeze. The pressure will blow the clog right out, backwards. Flip the safety back on, twist the tip back into its original spray position, and you're back in business. It’s a feature designed to keep you moving when you're on a job out in Paso Robles or Arroyo Grande.
When you need solid parts, advice you can trust, or professional service for your airless sprayer, the team at Contractor's Maintenance Service has your back. Stop by our San Luis Obispo shop or check out our inventory online at https://www.contractorsmaintenanceservice.com to keep your gear in prime condition.


Comments