


Choosing the Right Tip Size for Airless Sprayer Finishes
- Dec 15, 2025
- 14 min read
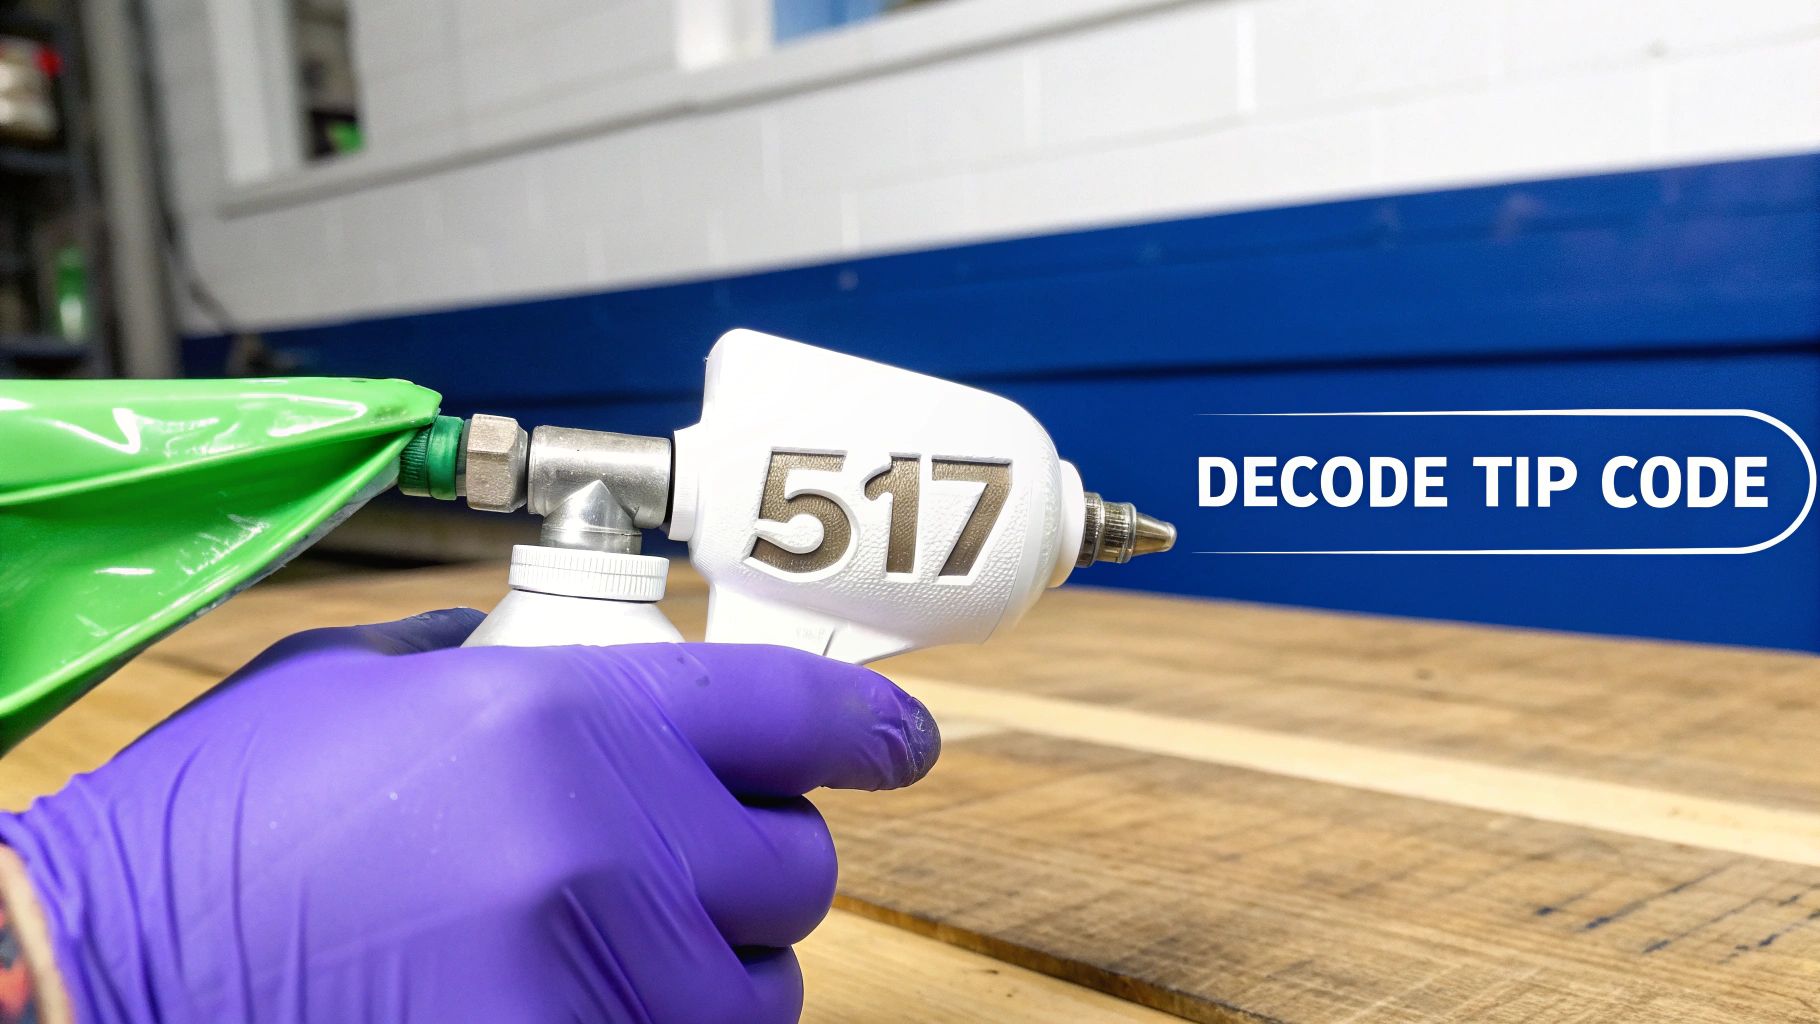
If you want a professional finish, picking the right tip size for your airless sprayer is the most important decision you'll make. It’s what directly controls your spray pattern and how much paint comes out. That three-digit code you see on the tip, like 517, tells you everything you need to know.
The first digit gives you the fan width, while the last two tell you the size of the hole, or orifice, that the paint shoots through.
How to Decode Airless Sprayer Tip Numbers
Think of an airless sprayer tip like the nozzle on your garden hose. You can twist it to get a wide, gentle fan for watering plants or a powerful, narrow stream for blasting mud off the sidewalk. The three numbers stamped on every airless tip give you that same control in a simple, standardized code.
Once you crack this code, you'll be able to confidently grab the perfect tip for any job, whether you're spraying broad exterior walls or fine-finishing cabinet doors. This isn't just about working faster; it's about minimizing overspray, saving paint, and laying down a flawless, even coat every time.
Understanding the Three-Digit Code
The system is surprisingly simple and breaks down into two parts. Let’s take a common 517 tip as our example:
The First Digit (Fan Width): Take the first number and multiply it by two. That’s your approximate spray fan width in inches when spraying from 12 inches away from the surface. For a 517 tip, that "5" means you'll get a 10-inch wide spray pattern (5 x 2 = 10).
The Last Two Digits (Orifice Size): These two numbers tell you the orifice, or opening size, in thousandths of an inch. On a 517 tip, the "17" means the orifice is 0.017 inches in diameter. This number is what dictates how much material flows through the tip.
This universal coding system, standardized across major brands since the 1970s, lets painters consistently match the right tip to the right material and job, no matter what sprayer they're using.
To make this even clearer, here’s a quick breakdown of some common tip sizes you’ll encounter on the job.
Quick Guide to Common Airless Tip Codes
Tip Code | Fan Width (at 12 inches) | Orifice Size (Inches) | Common Use Case |
|---|---|---|---|
311 | 6 inches | 0.011" | Fine finish, trim, cabinets (stains/lacquers) |
415 | 8 inches | 0.015" | Interior walls, ceilings (latex paint) |
517 | 10 inches | 0.017" | Exterior walls, large surfaces (thicker latex) |
621 | 12 inches | 0.021" | Broad surfaces, commercial jobs (elastomerics) |
This table should help you quickly translate those numbers into real-world performance, so you can spend less time guessing and more time spraying.
Whether you're working a job in San Luis Obispo or finishing a project in Paso Robles, this code ensures you get predictable, professional results every time. The same principle of matching the right tool to the job applies to other equipment, too. You can learn more in our complete guide to pressure washer spray tips.
How Orifice Size and Fan Width Affect Your Project
Okay, so you can read the three-digit code on an airless sprayer tip. Now for the important part: how those numbers translate to what happens on the job site. The two key pieces of that code—the orifice size and the fan width—are what control your speed, the quality of your finish, and how much paint you’re using. Getting this combo right is the secret to a flawless, efficient project.
Think of the orifice size like the valve on a garden hose. A bigger opening lets more water gush out, while a smaller one restricts it to a fine mist. That simple idea is everything when choosing the correct tip size for your airless sprayer, because it’s what dictates your material flow rate.
Orifice Size Dictates Your Flow Rate
A larger orifice, like the .017" on a 517 tip, is built for thick, heavy-bodied materials like exterior latex paint. It gives that thick paint enough room to flow out, atomize properly, and cover big surfaces fast without making your sprayer work overtime.
On the flip side, a smaller orifice, like the .011" on a 211 tip, is what you need for thin coatings like stains or lacquers. Trying to spray a thin stain through a big orifice would be like trying to water a delicate flower with a firehose—you’d just get a drippy, runny mess. The smaller opening gives you the control you need for a fine, even coat on more detailed surfaces. If you want a complete rundown of all types of essential decorating tools, including sprayers and their accessories, this is a great resource to explore.
Fan Width Determines Your Coverage Area
While the orifice controls how much paint comes out, the fan width determines where it goes. Remember, that first digit of the tip code (when you multiply it by two) tells you the width of your spray pattern in inches when you're holding the gun about a foot from the surface. This is huge for matching your spray pattern to whatever you're painting and working way more efficiently.
A wide fan is your best friend for big, open areas like ceilings, siding, and commercial walls. A narrow fan gives you the precision and control needed for detailed work like trim, cabinets, and fence posts.
For example, a 515 tip lays down a 10-inch fan, which is perfect for banging out interior walls in a San Luis Obispo home. Each pass covers a nice wide area, which means less time on the job. But if you’re in an Arroyo Grande workshop spraying cabinet doors, a 211 tip with its tight 4-inch fan gives you the accuracy to get a perfect coat without wasting a ton of paint on overspray.
Matching both the orifice and the fan width to your specific project, whether you're working in Atascadero or Pismo Beach, is how you stop wasting material, cut down on cleanup, and nail that perfect, professional-looking finish every single time.
Matching the Tip Size to Your Paint or Coating
This is where the rubber meets the road—or in our case, where the paint meets the project. Picking the right tip size for your airless sprayer is all about creating a perfect match between the material in your bucket and the hardware on your gun.
Think about it this way: a thin coating like a lacquer or stain needs a small orifice to get that fine, atomized finish without making a mess. Pushing it through a big tip would be like trying to write your name with a fire hose. It’s just not going to work.
On the flip side, trying to force thick stuff like exterior latex or elastomeric coatings through a tiny tip is a guaranteed recipe for frustration. You'll spend more time dealing with clogs than actually painting, all while putting a ton of strain on your sprayer's pump. The goal is to find that sweet spot where the coating flows just right and lays down smooth. For a deeper dive into getting it right, our guide on how to paint a room for a professional finish shows just how critical tip selection is to the final result.
This flowchart is a great starting point for thinking about fan width.
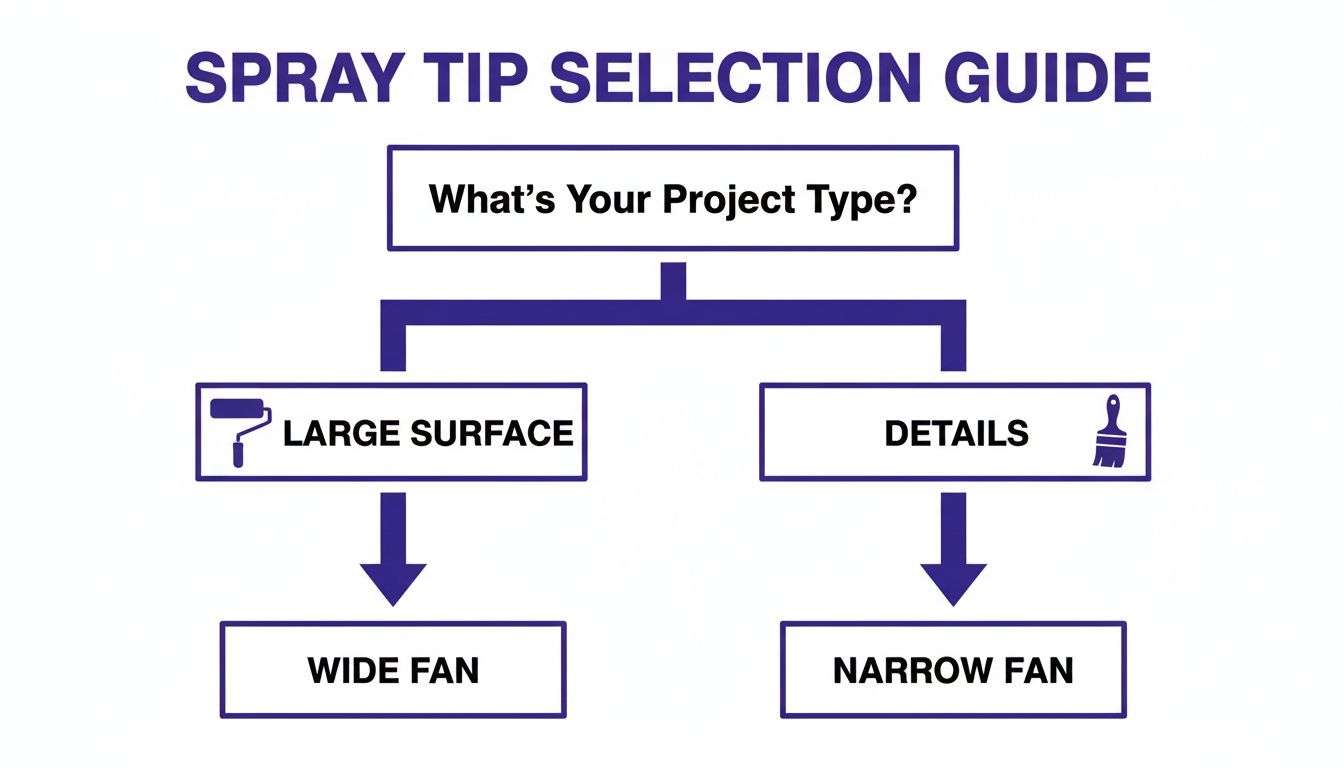
It breaks down the first big decision you need to make: do you need to cover a huge area quickly, or are you focused on tight, detailed work? That answer points you directly to the right fan width.
Your Paint Can Is the Best Starting Point
Before you even glance at a tip chart, the most reliable advice you can get is printed right on the side of your paint can. Most manufacturers provide a technical data sheet (TDS) that tells you the recommended airless sprayer tip size range for that specific product. They’ve already done the hard work, accounting for the paint’s viscosity and solids content to take the guesswork out of it for you.
Always check the TDS first. It's a simple step that can save you from a world of headaches, from constant clogs to a subpar finish. Whether you're a seasoned pro in Templeton or a weekend warrior in Grover Beach, this is one step you can't afford to skip.
Recommended Tip Sizes for Common Coatings
While the paint can is your best friend, it helps to have a general idea of where to start. We've put together this chart to give you a solid reference for common coatings. It's a quick way to narrow down your options before you head to the job site.
Coating Type | Recommended Orifice Range (Inches) | Typical Applications and Fan Width |
|---|---|---|
Stains & Lacquers | .009" - .013" | Cabinetry, trim, furniture (4-6 inch fan) |
Oil-Based Enamels | .013" - .015" | Doors, trim, metal railings (8-10 inch fan) |
Interior Latex | .015" - .019" | Walls and ceilings (10-12 inch fan) |
Exterior Latex | .017" - .021" | Siding, fences, exterior walls (12-14 inch fan) |
Elastomerics & Block Fillers | .025" - .035" | Masonry, textured surfaces (12-16 inch fan) |
Remember, this chart is a guide. Always double-check against the manufacturer's specs on the paint can to ensure you're getting the best possible performance and finish for your specific project.
The Critical Partnership Between Tips and Filters
Your spray tip isn't working alone. It has a crucial partner tucked away inside the gun: the filter. This filter is your last line of defense, catching any junk that managed to sneak past the manifold filter on the sprayer itself.
An improperly matched filter will either let debris through that clogs your tip or become blocked itself, starving the gun of paint. Think of it as a gatekeeper—it must be the right size to protect the passageway.
Matching the filter mesh to your tip size is absolutely essential for preventing clogs and keeping your workflow smooth. Here’s how they team up:
100-Mesh Filters (Fine): Pair these with your smallest orifice tips (around .008" to .014") when you're spraying thin materials like stains and lacquers.
60-Mesh Filters (Medium): This is the workhorse for most jobs. It’s the standard choice for latex paints and works perfectly with common tip sizes from .015" to .023".
30-Mesh Filters (Coarse): Save these for the really thick stuff. When you're pushing block fillers or elastomerics through large tips (.025" and up), this is the filter you need.
Graco’s data confirms this relationship: a 200-mesh (red) filter is best for stains and lacquers using .008" to .013" tips, while the ever-reliable 60-mesh (black) filter is built for latex and handles .015" to .029" tips. This filtering is incredibly precise; a 60-mesh screen is designed to capture over 99% of particles larger than 74 microns, stopping clogs before they can even start.
Ensuring Your Sprayer Can Handle Your Tip Choice
Picking the perfect tip size is only half the battle. You’ve got to make sure your airless sprayer can actually handle it. One of the most common—and costly—mistakes we see is forcing a sprayer to use a tip that's too large for its pump. It’s a simple mismatch that can create a world of frustration on the job site.
Think of it like trying to run a marathon in shoes that are two sizes too small. You might make it a few miles, but you’ll be inefficient, uncomfortable, and you're bound to do some real damage. It’s the same thing here: pushing your sprayer past its limits forces the pump to work overtime. The result is a poor, uneven spray pattern and premature wear that can burn out your motor.
Check Your Sprayer's Maximum Tip Rating
Every airless sprayer has a maximum supported tip size, and that number is directly tied to its flow rate, measured in gallons per minute (GPM). This critical piece of information is usually printed on a label right on the sprayer unit or buried in the owner's manual. A quick check is all it takes to protect your investment and sidestep most common sprayer failures.
For instance, a homeowner-grade sprayer might max out at a .015" tip, which is perfectly fine for stains and standard latex paints. A professional workhorse like the Graco Ultra 390 Airless Paint Sprayer, on the other hand, can easily handle much larger tips for heavier materials.
A simple check of your sprayer's specs before you start a project is the single best way to protect your equipment. It keeps your machine running efficiently and prevents expensive, avoidable repairs down the road.
This is especially true for painting contractors working across the Central Coast, from Paso Robles to Arroyo Grande. Making sure your gear is properly matched for the job prevents unnecessary downtime and keeps your projects on schedule.
The Cost of Ignoring Your Sprayer's Limits
Gambling on a tip that's too big for your sprayer rarely pays off. Based on our service data, simply matching the tip size to your sprayer's specs prevents an estimated 80% of common equipment failures. When you push those limits, you risk burning out the motor—a repair that can easily cost upwards of $500. For a deeper dive, check out Graco's airless spray tip recommendations to learn more.
Troubleshooting Common Issues and Extending Tip Life
Even with the perfect setup, every painter eventually runs into frustrating issues on the job. Knowing how to quickly diagnose and fix common problems—and how to prevent them in the first place—is what separates the pros from the amateurs. The right troubleshooting know-how keeps your projects in San Luis Obispo moving smoothly and saves you money in the long run.
The most common headache you'll face is a clogged tip. Fortunately, most modern airless sprayer tips, like the Graco RAC (Reverse-A-Clean) series, have a clever built-in solution.
When a clog brings your work to a halt, just turn the tip 180 degrees and spray onto a piece of cardboard or scrap material. The reversed flow blasts the blockage right out. Flip it back, and you're good to go—no need to stop and take anything apart.
Identifying and Solving Common Spray Pattern Problems
Beyond a full-blown clog, the quality of your spray pattern is the best health indicator for your whole system. If you start seeing problems in your finish, your equipment is trying to tell you something's wrong.
One of the most common issues is "tailing," where the spray pattern forms an uneven, dumbbell shape with heavy bands of paint at the top and bottom. This is a clear signal that the paint isn't being atomized properly, usually due to low pressure or a worn-out tip.
Before you toss the tip, try bumping up the pressure a little. If the tails disappear, problem solved. But if the pattern doesn't clean up, it's a nearly certain sign your tip is worn out and ready for replacement. For a deeper dive, our guide on Wagner paint sprayer troubleshooting offers quick fixes for common issues that can be applied to many different sprayer brands.
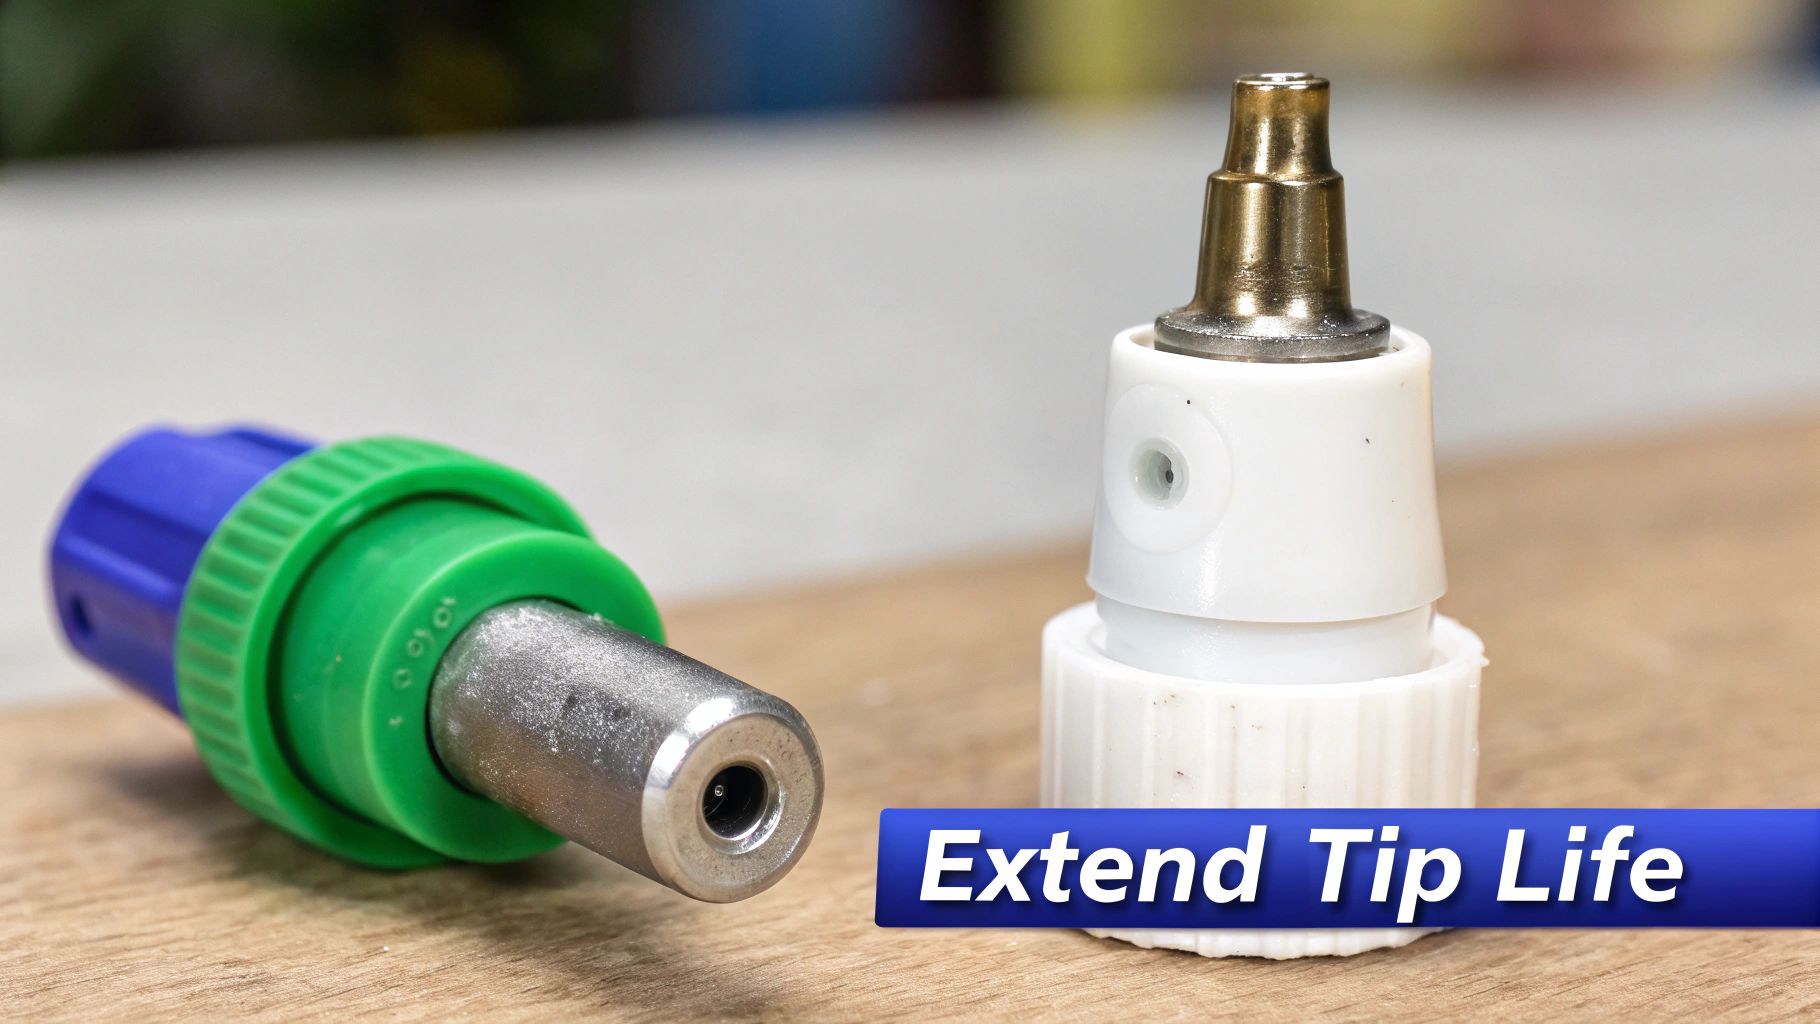
Extending Tip Life Through Proper Care
Airless sprayer tips are tough—they're made from durable tungsten carbide—but they are absolutely wear items. They don't last forever. As abrasive paints and coatings blast through that tiny orifice at high pressure, the opening gradually gets bigger and the fan pattern starts to round off.
A worn tip doesn't just produce a sloppy finish; it wastes a ton of paint. Here’s how you can squeeze every bit of life out of your tips and know when it’s time to call it quits:
Clean Immediately: Don't let paint dry in the tip. As soon as you're done, clean it thoroughly with the right solvent—water for latex, mineral spirits for oil-based coatings.
Use Soft Brushes: Never, ever use a wire brush or any hard object to clean the orifice. You'll damage it in a heartbeat. A simple soft-bristle brush is all you need.
Store Properly: Keep your tips in a small container with a little solvent or pump armor. This prevents any leftover paint from drying inside and causing clogs on the next job.
Following these simple steps will dramatically extend the life of your tips, saving you money and a lot of frustration on projects from Atascadero to Arroyo Grande.
Expert Airless Sprayer Service in San Luis Obispo
Even the most well-maintained rig can hit a snag that a quick tip swap won't solve. When your airless sprayer needs a professional eye, getting it fixed fast is the only thing that matters. Your projects, and your profits, are on the line.
That's where having a local expert in your corner makes all the difference. For painting contractors and serious DIYers up and down the Central Coast, we're the go-to shop for sprayer diagnostics, repairs, and parts. Our whole game is about getting your equipment back to peak condition with minimal downtime.
Your Local Partner for Sprayer Maintenance
We get it—schedules are tight and delays cost money. Think of us as your local partner, armed with the know-how and the parts to keep you from getting sidelined by equipment failure. Whether you're dealing with a complex pump problem or just need routine maintenance, our technicians have your back.
Our service area covers the heart of the Central Coast, so professional help is never far away.
We're here for the local trades. When your sprayer goes down, the job stops. Our number one priority is getting you back to work with fast, reliable repairs and the right parts on the shelf.
We're proud to serve our local communities, including:
San Luis Obispo
Arroyo Grande
Pismo Beach
Grover Beach
Morro Bay
Atascadero
Paso Robles
Templeton
Whether you need to figure out a tricky sprayer issue, get an expert repair done right, or just grab some genuine Graco and Titan replacement parts, our team is here to help. We keep a solid stock of the essentials, from a huge range of sprayer tips and filters to hoses and packing kits.
Give us a call today for service you can count on, some straight-up advice on choosing the correct tip size for your airless sprayer, or to track down the exact part your machine needs.
Got Questions About Airless Sprayer Tips? We’ve Got Answers.
Even after you’ve got the basics down, a few questions always seem to pop up on the job. Let’s tackle some of the most common ones painters ask, so you can solve problems on the fly and pick the right tip size for your airless sprayer with total confidence.
How Long Does an Airless Sprayer Tip Last?
Think of an airless sprayer tip like the tires on your truck—it’s a wear item. How long it lasts comes down to two things: how abrasive your material is and the pressure you’re spraying at.
For Latex: You can expect a tip to last for about 15-40 gallons of paint.
For Stains & Oils: With less abrasive materials, you can often push 35-60 gallons through a tip before it’s shot.
You’ll know it’s time for a new one when your fan pattern starts getting smaller and the edges become rounded. This forces you to overlap more and waste paint just to get decent coverage.
Are Airless Sprayer Tips Universal?
For the most part, yes. The numbering system—that 517 you see on the side—is standard across the big names like Graco and Titan. The tip guards that hold them in place are also largely interchangeable.
This means you can usually pop a Graco RAC X tip into a Titan guard (and vice versa) without any trouble. For contractors here on the Central Coast, from San Luis Obispo to Arroyo Grande, that kind of compatibility between different rigs is a lifesaver. Just be sure to double-check if you're working with a specialty or fine-finish system.
A worn-out tip doesn't just give you a worse finish—it can make you burn through 20% more paint. Swapping it out on time is one of the easiest ways to save cash on materials and cut down on labor.
What Happens If My Tip Is Too Small for My Paint?
Trying to force thick paint through an orifice that’s too small is a surefire way to spend your day dealing with clogs. It’s a constant battle.
The sprayer's pump has to work overtime to push the material through that tiny opening, which leads to a sputtering, inconsistent spray pattern. Not only that, but it puts a ton of strain on your machine and brings the whole job to a halt. Always look at the paint can’s technical data sheet—the manufacturer will tell you the minimum tip size they recommend.
Can I Use the Same Tip for Primer and Topcoat?
Sometimes you can, but it really depends. If your primer and topcoat are pretty close in viscosity, you might be able to get away with using the same tip. For instance, a standard latex primer and a latex topcoat can often both be sprayed with the same 517 tip.
But if you’re using a thick, high-build primer or a heavy block filler, you’ll need a much larger orifice than you would for a standard topcoat. No matter what, make sure you clean the tip thoroughly between materials. When in doubt, just follow the specific recommendations for each product. Whether you're in Paso Robles or down in Pismo Beach, taking that extra step is what guarantees a pro-level finish.
When you need straight answers or genuine replacement parts, Contractor's Maintenance Service is the go-to resource for pros on the Central Coast. We keep your equipment in top shape so your projects stay on track. Find the right parts and service at https://www.contractorsmaintenanceservice.com.


Comments