


Using airless sprayer: A Contractor's Guide to Flawless Finishes
- Feb 7
- 17 min read
For a professional contractor, an airless sprayer isn't just a tool—it's your key to maximizing speed, precision, and profitability on every job. This guide is your complete roadmap. We're going beyond the user manual to share real-world insights that will boost your efficiency and help you deliver a superior finish every single time.
Your Blueprint for Flawless Airless Spraying

When you truly master an airless sprayer, you transform it from a piece of equipment into a core business asset. It’s what lets you cover massive areas quickly—from commercial buildings to industrial machinery—while laying down a perfectly uniform coat that brushes and rollers just can't compete with.
This guide delivers actionable advice for every stage of the process, ensuring you get the absolute most out of your equipment. We'll cover the fundamentals of choosing the right sprayer and tip, then dive deep into setup, surface prep, and perfecting your spraying technique. You'll also learn the critical cleanup and maintenance routines that are essential for preventing costly downtime on site.
The Professional Advantage
If you're a painting contractor, facilities manager, or part of a public works crew, efficiency is everything. An airless sprayer gives you a serious edge in a few key ways:
Speed: You can apply paint up to 10 times faster than with traditional methods. That's a game-changer for productivity.
Quality: It produces a mirror-smooth, even finish without a single brush stroke or roller mark in sight.
Versatility: A good sprayer can handle a huge range of coatings, from thin lacquers to thick, heavy-bodied elastomeric paints.
These benefits are exactly why airless sprayers are now an industry standard. In fact, the global market is projected to hit $882.4 million soon, a clear sign of how much pros rely on this technology. For businesses like ours that service top brands like Graco and Wagner, these numbers reflect a deep dependence on sprayer uptime in construction and industrial maintenance.
Properly used, a quality airless sprayer can even cut overspray by up to 50% compared to conventional spray guns, which saves you a ton on material costs.
Serving California's Central Coast Professionals
Having a reliable machine is only half the battle; knowing who to call when you need support is just as important. For pros working up and down the Central Coast, having quick access to parts and expert service is non-negotiable.
Whether you're on a large commercial project in Paso Robles or handling municipal maintenance in Santa Maria, equipment failure brings everything to a halt and hits your bottom line. A local service partner gets you back to work, fast.
Contractor's Maintenance Service is here to support professionals throughout the region. We're the go-to resource for painters and contractors in:
San Luis Obispo
Paso Robles
Atascadero
Templeton
Morro Bay
Arroyo Grande
Santa Maria
From routine maintenance that prevents breakdowns to emergency repairs that get you out of a jam, we make sure your equipment performs flawlessly. If you're currently in the market for new gear, be sure to check out our guide on finding the best airless paint sprayer for contractors.
Choosing the Right Sprayer Tip and Pressure Settings
The secret to a flawless, professional finish isn't just about the machine you're running; it’s about the small, critical details. The most important of these are your spray tip and your pressure settings. Get this combo right, and you’ll lay down a perfect coat every time. Get it wrong, and you're in for a frustrating day of runs, drips, and uneven coverage.
Think of the spray tip as the lens on a camera—it shapes and directs the final output. Every tip has a three-digit number, like the common 517, which tells you everything you need to know. It’s a simple code that unlocks precise control over your work.
That first digit, when you double it, gives you the fan width in inches when you’re spraying from about a foot away. The last two digits tell you the orifice size in thousandths of an inch, which dictates how much paint can flow through. This isn’t just techy stuff; it directly impacts your speed and finish quality on every single job.
Decoding the Spray Tip Numbers
Let's break down that "517" example to see how it works on a real job site.
The "5" (Fan Width): Multiply 5 by 2, and you get a 10-inch spray fan. This is a versatile, workhorse size, perfect for blasting out broad surfaces like commercial exteriors or big, empty interior rooms where speed is money.
The "17" (Orifice Size): This means the orifice is 0.017 inches in diameter. A .017 is the sweet spot for most standard materials like interior latex and exterior acrylics.
Now, let's say you're switching from that big wall to some detailed trim work. You wouldn't stick with the 517. You’d probably grab a 311 tip. This gives you a tighter 6-inch fan for better control and a smaller .011 orifice for less material flow, which prevents that heavy, sloppy buildup on narrow surfaces. For a deeper dive, check out our guide on choosing the right tip size for airless sprayer finishes.
The Myth of Maximum Pressure
I see this all the time—a painter cranks the pressure dial all the way up, thinking more power equals a better finish. In reality, that "max power" approach is just blowing paint and money into the air. It creates a ton of overspray, wastes material, and wears out your tips twice as fast.
The goal isn't to use the highest pressure possible. It's to use the lowest pressure needed to get a fully atomized spray pattern. A perfect pattern is uniform from edge to edge, with no "tails" or heavy lines.
Here’s how you find that sweet spot: start with low pressure and spray a test pattern on some cardboard. Slowly dial up the pressure just until those tails disappear and the pattern evens out. This simple trick saves a surprising amount of paint and extends the life of your gear.
Matching Tip and Pressure to the Material
The thickness of your coating—its viscosity—is the final piece of the puzzle. Heavier-bodied paints need a larger orifice to flow properly without constant clogging.
Here are a few common scenarios we see with pros on the Central Coast, from Paso Robles to Santa Maria:
Scenario 1 Thick Elastomeric Coatings: For those heavy waterproof coatings used on commercial buildings in San Luis Obispo, you’ll need a big orifice. Think a 525 or even a 527, paired with higher pressure to properly atomize that thick goop.
Scenario 2 Interior Latex Paint: On a standard residential repaint in Arroyo Grande or Atascadero, a 515 or 517 tip with moderate pressure is the go-to combo. It gives you perfect, consistent coverage on drywall.
Scenario 3 Fine-Finish Enamels: When you’re spraying doors or trim in Morro Bay and need that glass-smooth finish, you’ll want a fine-finish tip like a 310 or 412. These tips, combined with carefully adjusted low pressure, deliver a finish that looks like it came straight from the factory.
Mastering Your Airless Spraying Technique
Once you’ve dialed in your tip and pressure, the quality of your finish comes down to pure technique. The way you move, the angle you hold the gun, and even how you manage your hose separates a fast, pro job from one plagued by drips, thin spots, and inconsistent coverage.
Using an airless sprayer right is a physical skill, and like any craft, it’s built on a few core fundamentals. Nailing these isn't just about making the final coat look good—it's about working faster and smarter. A sloppy technique wastes paint through excessive overspray and forces you to lose time fixing mistakes.
The Core Fundamentals of Spraying
Think of these principles as the foundation of every pass you make with the gun. Get them right, and they become muscle memory, letting you produce flawless results without even thinking about it.
First up, maintain a consistent distance from the surface. For most paints and stains, this sweet spot is 10 to 12 inches. Get too close, and you'll overload the surface, causing runs and sags. Too far, and the paint starts to dry mid-air, landing as a rough, sandy texture and wasting a ton of material to overspray.
Next, you have to keep the gun perfectly perpendicular to the surface. Always. A classic rookie mistake is swinging your arm in an arc. This "arcing" motion dumps a heavy coat of paint in the middle of the swing and feathers it out at the ends, leaving ugly stripes that are impossible to hide.
Achieving a Seamless Overlap
To create a uniform, seamless coat, every pass you make needs to overlap the previous one by 50%. This means you should aim the center of your spray pattern directly at the edge of the pass you just sprayed. It's the only way to ensure every square inch of the surface gets an identical amount of paint.
A consistent overlap is non-negotiable on large, flat surfaces like commercial walls or warehouse ceilings. Without it, you’ll see distinct lines or "striping" once the paint cures, especially when the light hits it just right. It’s a dead giveaway of an amateur job.
Pro Tip: When you're spraying, move with your whole arm, not just your wrist. This is the key to keeping the gun straight and maintaining that critical perpendicular angle, fighting the natural tendency to arc your motion.
Perfecting Your Trigger Discipline
One of the most important skills in airless spraying is what we call "trigger discipline." Here's the rule: always start your arm motion before you pull the trigger and release the trigger before you stop your motion.
If you pull the trigger while the gun is stationary, you'll blast a heavy glob of paint onto the surface—the perfect start for a run or drip. The same thing happens if you stop moving before letting go. The sequence is simple: move, pull, spray, release, stop. This one habit will eliminate 90% of heavy spots at the beginning and end of each stroke.
Strategies for Different Surfaces
Your approach has to adapt to what you're painting. You can't spray a complex piece of machinery the same way you spray a big, flat wall.
Large Flat Walls: Work in sections you can comfortably complete without stopping. I always start at a top corner and spray horizontally across the wall. Then, drop down and spray the next pass back in the opposite direction, making sure to hit that 50% overlap.
Complex Machinery or Structures: On industrial jobs, you’re often dealing with complex shapes. I’ve learned to tackle the inside corners and edges first. Then I move to the larger, flatter areas. This simple trick keeps you from dragging your hose through wet paint on the main surfaces.
Speaking of the hose, always give yourself plenty of slack and plan your path. A tangled hose can snag on equipment, pull your gun off-target, or drag across a fresh coat. It can ruin your finish in a heartbeat.
When and Why You Should Back-Roll
Finally, even with perfect technique, some jobs just need to be back-rolled. This means having a second person follow right behind the sprayer with a roller, lightly rolling over the wet paint. It’s often specified for porous or uneven surfaces like new drywall or rough masonry.
Back-rolling physically pushes the paint into the surface's texture, ensuring you get maximum adhesion and hide any minor imperfections in the finish. For high-end residential or commercial projects, this step is often the key to achieving that flawless, uniform texture the client is paying for.
Efficient Cleanup and Essential Maintenance Routines
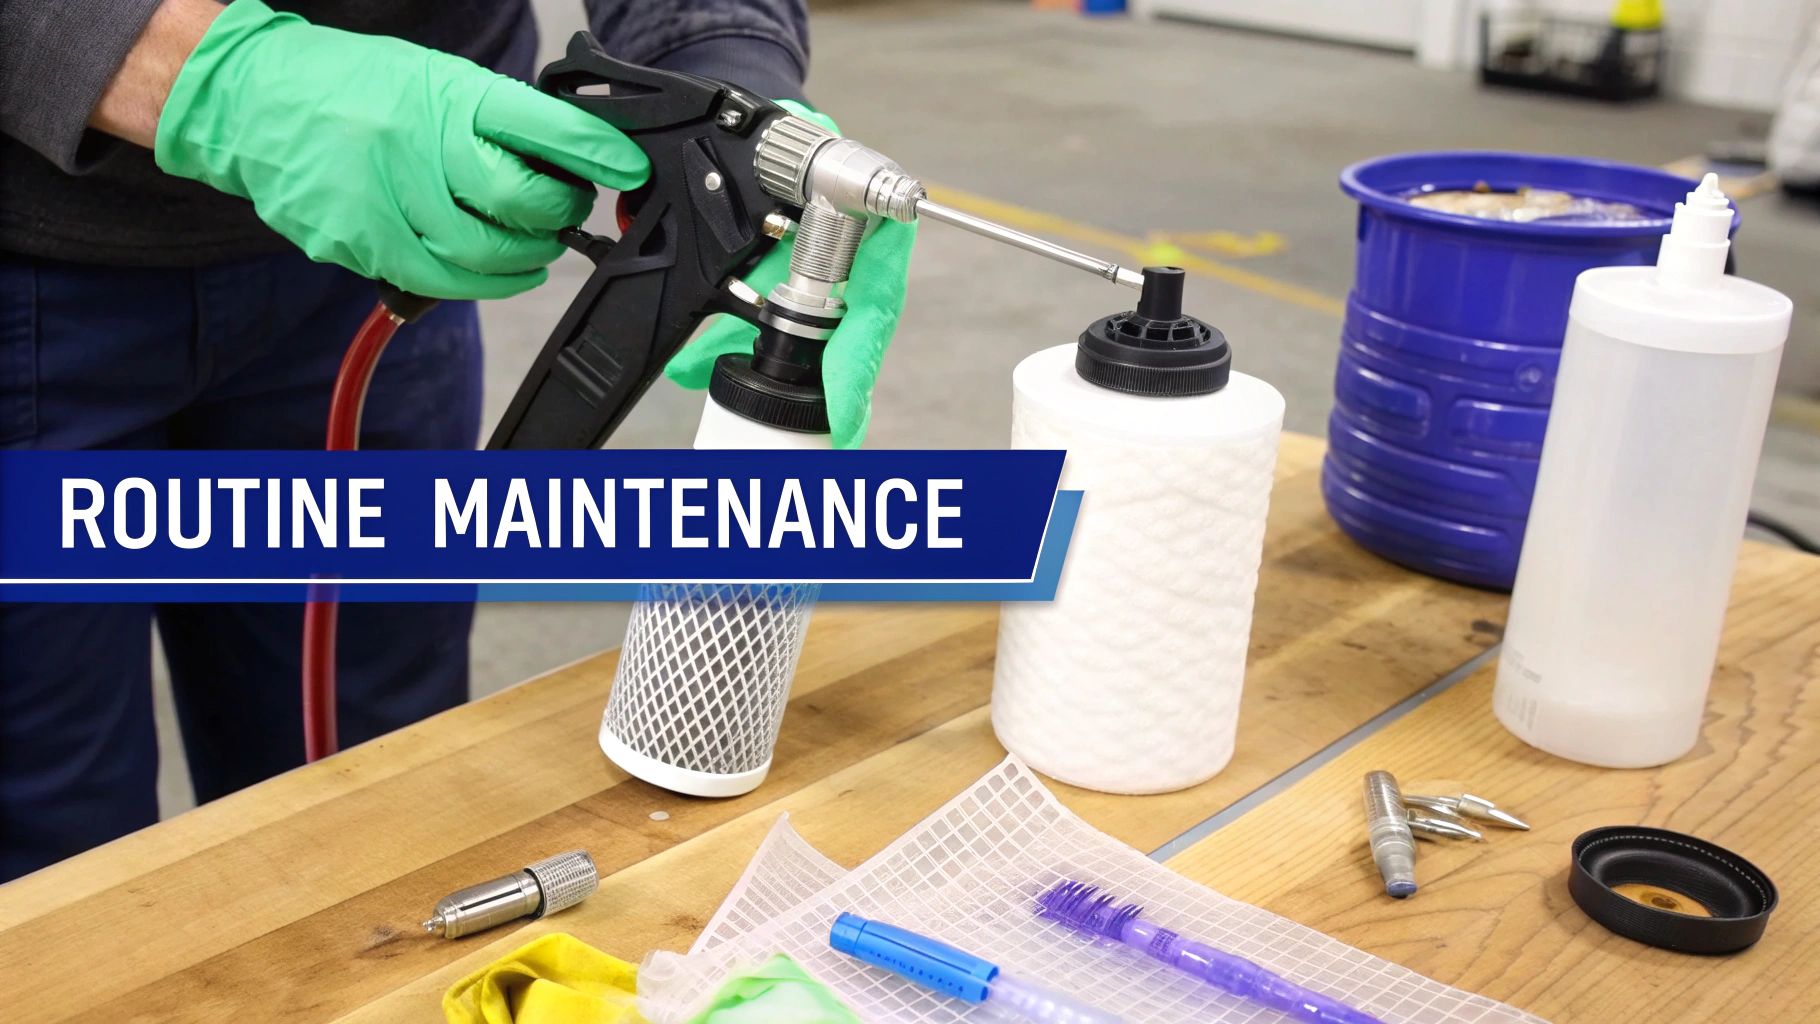
For a real pro, the job isn't done when the last pass is sprayed. The work that saves you the most money starts right after. A meticulous cleanup and a solid maintenance routine are what separate a sprayer that runs for years from one that dies mid-job, wrecking your profits with repair bills and delays.
Downtime is just lost money. A clogged gun, a corroded pump, or a blown hose will shut down your whole operation in a heartbeat. The good news is these problems are almost always preventable with a few minutes of care at the end of each day.
The Cleanup Process That Actually Works
The exact steps change a bit depending on what you're spraying, but the goal never does: get every last speck of paint out of the system. Dried paint is the arch-nemesis of an airless sprayer, causing clogs in the gun, filters, and tip.
For Water-Based Materials (Latex, Acrylics)
Start by relieving all the pressure in the system. Drop the suction tube into a bucket of clean water and clip the return tube into a waste pail.
Run the sprayer on low pressure to pump the leftover paint from the hose back into its bucket. Keep going until you see clear water coming out.
Flip the prime valve to "spray." With the tip guard off, trigger the gun into your waste pail to flush the hose and gun. Crank up the pressure to blast out any stubborn gunk.
Finally, take apart the gun and tip guard. Give the gun filter, tip, and guard a good cleaning with a soft brush and warm, soapy water. Never use a wire brush or anything sharp to clean a spray tip—you'll ruin the orifice.
For Solvent-Based Materials (Oils, Lacquers)
The routine is basically the same, but you’ll use the right solvent—like mineral spirits or lacquer thinner—instead of water. And of course, always follow safety rules for handling flammable liquids.
Use two pails: one for the first, paint-filled flush, and a second with clean solvent for the final rinse. This trick saves you a ton of solvent and gets the machine much cleaner.
Keep running clean solvent through the rig until it comes out perfectly clear. This is non-negotiable for preventing material from hardening up inside the pump and hose.
For a full, step-by-step breakdown of the cleaning process, check out our in-depth guide on how to clean an airless paint sprayer like a pro.
Stay Ahead of Breakdowns with Proactive Maintenance
Cleaning is daily, but proactive maintenance is what really defends you against those surprise failures. It’s all about catching wear and tear before it becomes a full-blown crisis.
A well-kept sprayer is a money-making machine. That's a big reason why the airless sprayer market is so dominant, expected to pull in 41.2% of all spray painting machine revenue. This technology leads because it's fast and can slash material waste by up to 40%, but that efficiency is totally dependent on proper care. You can learn more about the industry's growth in this spray painting machine market report.
Your Go-To Maintenance Checklist
Filters: Check and clean your gun and manifold filters every single day. A clogged filter chokes the flow, overworks the pump, and leaves a garbage finish.
Packings: Keep an eye on the pump packings for any leaks. Worn packings are the number one cause of pressure loss. If you spot paint or fluid dripping from the pump, it's time to replace them.
Hose Inspection: Before you fire it up, walk the entire length of the hose. Look for kinks, cuts, or bulges. A damaged hose is a massive safety hazard that can burst under thousands of PSI.
Pump Armor for Storage: If your sprayer is going to sit for more than a few days, you have to flush it with a storage fluid like Graco Pump Armor. It stops corrosion in its tracks and keeps the seals from drying out, so your rig is ready to go when you are. This is especially key for pros in San Luis Obispo and other coastal areas where the salt in the air speeds up corrosion.
Troubleshooting Common Airless Sprayer Problems
Even with the best gear and a dialed-in maintenance routine, things eventually go wrong on a job site. Every pro who runs an airless sprayer has been there. One minute you're laying down a perfect coat, the next, your machine is sputtering, and your day grinds to a halt.
Time is money, and a sprayer that won't cooperate is a profit killer. The real skill isn't just spraying—it's knowing how to diagnose a problem fast, fix it right there on the truck, and get back to making money without missing a beat. This guide is your on-site cheat sheet for the most common issues we see in the field.
Sprayer Won’t Prime or Build Pressure
It’s one of the most common calls we get: the sprayer is running, but it just won't pull paint. You can hear the motor churning away, but nothing’s happening at the gun. Before you start thinking about a costly repair, run through this quick checklist. The fix is usually simpler than you think.
Stuck Intake Valve: This is suspect number one. A tiny piece of dried paint or debris can keep the ball from seating properly, killing the pump's suction. A quick fix is to give the outside of the fluid section a few gentle taps with a mallet or the handle of your screwdriver. Often, that's all it takes to knock the ball loose.
Air Leaks in the Suction Tube: Make sure your suction tube is fully submerged in the paint. More importantly, check that the intake strainer isn't completely caked with gunk. A loose fitting where the tube connects to the pump is another classic culprit—it will suck air instead of paint all day long.
Prime Valve and Return Hose: This might sound obvious, but always double-check that your prime valve is set to "prime." Also, take a quick look at the return hose to make sure it isn't kinked or clogged, which would stop the fluid from circulating back into the bucket.
Fixing an Inconsistent Spray Pattern
Your spray pattern is the best indicator of how well your rig is performing. If you're seeing "tails"—those heavy lines on the edges of your fan—it's a dead giveaway that the paint isn't being atomized correctly.
This problem almost always boils down to two things: pressure or the tip.
Your first move should be to increase the pressure in small bumps until the tails disappear. If you have to crank the pressure to the max and the pattern still looks off, your spray tip is almost certainly worn out or damaged.
A worn tip doesn't just leave a bad finish. It wastes a ton of paint by creating more overspray and putting down way more material than you need. A new tip is a cheap fix that pays for itself almost immediately in material savings and better-looking work.
Sudden Pressure Drops During Use
You’re in a groove, spraying perfectly, and then—bam—the pressure just falls off a cliff. This is another headache that can usually be traced back to a simple clog. Before you tear into the pump, check your filters. A clogged filter is the #1 reason for a sudden loss of pressure.
Start with the easiest one: the gun filter. Just unscrew the handle and pull it out. If it’s loaded with debris, a quick clean or a fresh replacement will often get you back up and running. If that doesn't solve it, the next stop is the manifold filter inside the sprayer itself. A blockage there will starve the whole system.
Having the right parts on hand is what separates the pros from the amateurs. A well-stocked truck makes these on-the-fly fixes possible. It's why the airless sprayer accessories market is projected to hit $1,611.3 million by 2035. Here at Contractor's Maintenance Service in San Luis Obispo, we keep essential parts for brands like Graco—tips, filters, and hoses—in stock so local contractors can avoid costly downtime. You can dig deeper into this market trend by checking out the full airless sprayer accessories market report.
When you're out on a job, you can't afford to waste time guessing what's wrong. Here's a quick-reference table to help you troubleshoot the most frequent issues you'll encounter with your airless sprayer.
Common Airless Sprayer Issues and Fixes
Symptom | Potential Cause | Solution |
|---|---|---|
No Spray at All | Unit not primed, clogged tip, or empty paint container. | Prime the unit. Clean or replace the spray tip. Refill the paint. |
Inconsistent Spray Pattern ("Tails") | Pressure too low or a worn spray tip. | Increase the pressure setting. If that fails, replace the spray tip. |
Sprayer Spits Paint | Air in the system or a nearly empty paint container. | De-pressurize and re-prime the system. Ensure the suction tube is fully submerged. |
Motor Runs But No Pressure | Stuck intake or outlet valve. Clogged filters. | Tap the fluid section to free the valve. Clean gun and manifold filters. |
Significant Overspray | Pressure is set too high for the tip and material. | Reduce the pressure setting until the spray pattern is consistent without excessive mist. |
Tip Clogs Frequently | Paint not strained properly or using the wrong tip size. | Strain all paint before use. Ensure the tip orifice is appropriate for the material viscosity. |
This table should get you through most common hiccups. By starting with the simplest solutions, you can often solve the problem in minutes and keep your project on schedule.
Need an Airless Sprayer Expert in San Luis Obispo?
You can solve most airless sprayer hiccups with good maintenance and some on-the-spot troubleshooting. But every now and then, you run into a stubborn problem that just won’t quit. That’s usually a sign of something deeper.
When you’re dealing with tricky electrical failures, internal pump damage, or a component that needs a full overhaul, bringing your machine to a certified technician is the fastest way to get back on the job.
Don't let a major breakdown blow up your project timeline and your budget. For any pro working on California's Central Coast, having a reliable local service center you can trust is key to minimizing downtime and protecting your gear.
Authorized Service for the Central Coast
Contractor's Maintenance Service is the authorized service and warranty center for the biggest names in the game, including Graco, Wagner, and Titan. We’re based right here in San Luis Obispo, and our certified techs have the right diagnostic tools and a massive stock of genuine parts to handle any repair—big or small.
We're proud to support painting contractors and industrial maintenance crews all over the region. If you're working in San Luis Obispo or the surrounding areas, we've got your back. Our primary service areas include:
San Luis Obispo
Paso Robles
Atascadero
Templeton
Morro Bay
Arroyo Grande
Santa Maria
Whether it's persistent pressure loss, a motor that won't turn over, or an urgent warranty claim, we get it—your equipment is your livelihood. Our entire focus is on delivering fast, solid repairs that can handle the grind of professional use.
When your sprayer goes down, every hour counts. We prioritize contractor repairs because we know that project deadlines don't wait. Our goal is to get your equipment diagnosed, fixed, and back in your hands as quickly as possible.
We do it all, from routine tune-ups and complete pump repacks to emergency field repairs and even custom hydraulic hose fabrication. Instead of burning valuable hours trying to figure out a complex internal problem, let our team take care of it. Contact us for dependable service from people who understand your urgency.
Airless Sprayer FAQs: Your Questions Answered
Even with a solid plan, questions always pop up on the job. Here are some of the most common things contractors ask about running an airless sprayer, with straightforward answers to keep you moving and protect your gear.
How Often Should I Replace My Airless Sprayer Tip?
Forget tracking time—tip life is all about the gallons you've pushed through it. A tip's lifespan really depends on how abrasive your material is and the pressure you're running.
As a solid rule of thumb for standard latex paint, plan on swapping in a new tip after every 40 to 50 gallons. You'll know it's shot when that crisp, sharp spray fan starts to look rounded and you notice more overspray than usual. Pushing a worn tip just wastes paint and ruins your finish, making a fresh tip a smart, cost-effective investment.
Can I Use an Extension Cord with My Electric Sprayer?
You can, but this is one of those details you have to get right. Running an undersized or ridiculously long extension cord creates a major voltage drop, which will cook your sprayer's motor and cause permanent damage.
Always check your sprayer's manual for what the manufacturer recommends. For most pro rigs, a heavy-duty, 12-gauge cord no longer than 100 feet is the absolute minimum. And whatever you do, never daisy-chain multiple extension cords together. That's a recipe for disaster that increases resistance and starves the motor of the power it needs to run properly.
What Is the Best Way to Store My Airless Sprayer?
Proper storage is what saves you from dealing with internal corrosion and seized-up parts between jobs. This is especially true for anyone working in coastal areas like Morro Bay or Arroyo Grande where the salt air is a killer. After a deep clean, you have to flush a dedicated storage fluid, like Graco Pump Armor, through the entire system.
This stuff does two critical things: it pushes out any leftover moisture to stop rust in its tracks, and it lubricates all the internal parts and seals. That keeps everything from drying out, cracking, or freezing. Once it's protected, find a dry, secure spot away from extreme heat or cold to store your sprayer.
Why Is My Sprayer Leaving Lines in the Pattern?
Seeing distinct lines at the edges of your spray pattern—what pros call "tails" or "fingers"—is a dead giveaway that the paint isn't atomizing correctly.
This problem almost always boils down to two culprits:
Your pressure is too low. The sprayer just doesn't have enough muscle to break up the material.
Your spray tip is worn out. The orifice has eroded, which messes up the fan pattern.
The first thing to do is bump up the pressure a little at a time until the tails vanish. If you max out the pressure and you're still seeing lines, it's a sure sign that you need to replace your spray tip.
When you've tried everything and the rig still isn't working right, you need an expert. Contractor's Maintenance Service is the authorized service center for pros in San Luis Obispo and the surrounding areas. For reliable repairs, parts, and advice that keeps you on the job, visit us online at https://www.contractorsmaintenanceservice.com.


Comments