


The Ultimate Sprayer Tip Chart for Professionals
- Feb 8
- 14 min read
Trying to make sense of a sprayer tip chart can feel like you're staring at a foreign language. But once you crack the code, you'll see it’s a beautifully simple system designed to give you total control over your finish.
Think of a sprayer tip chart as your translator. It takes that three-digit number stamped on every airless tip (like a 517) and turns it into two critical pieces of information: the spray fan width and the orifice size. Getting this right is the secret to a perfect, professional-grade finish, every single time.
Decoding Your Sprayer Tip Chart Instantly
Picking the right sprayer tip is hands down the most critical decision you'll make on a job, but it’s also where most painters get tripped up. Those numbers directly control how much material you're laying down and how wide your spray pattern is.
Get it wrong, and you're in for a world of frustration—runs, drips, thin spots, and a cloud of overspray that wastes time and money. A good sprayer tip chart eliminates all that guesswork.
Understanding the three-digit code is actually pretty straightforward.
The First Digit: Just multiply this number by two. That gives you the width of your spray fan (in inches) when you're spraying about 12 inches from the surface. For a "517" tip, the first digit is 5. So, 5 x 2 equals a 10-inch spray fan.
The Last Two Digits: This number tells you the orifice size in thousandths of an inch. On that same "517" tip, the last two digits are 17, which means the hole is 0.017 inches wide. This is what controls your flow rate, or gallons per minute (GPM).
This isn't just a system for paint; it's a universal standard used across different industries. Take agriculture, for instance. A farmer choosing a tip like the 110-03 from a chart knows it will deliver precisely 0.3 GPM at 40 PSI, which is crucial for getting uniform crop coverage without wasting chemicals.
Decoding Sprayer Tip Numbers At A Glance
To make it even easier, here's a quick cheat sheet for interpreting any standard three-digit tip number you come across.
Tip Number (Example) | First Digit Interpretation (Fan Width) | Last Two Digits Interpretation (Orifice Size) | Example Application |
|---|---|---|---|
517 | 5 x 2 = 10-inch fan width | 17 = 0.017" orifice | Ideal for latex paint on interior walls |
311 | 3 x 2 = 6-inch fan width | 11 = 0.011" orifice | Great for trim, doors, and finer finishes |
621 | 6 x 2 = 12-inch fan width | 21 = 0.021" orifice | Suited for thicker materials on broad surfaces |
This simple breakdown takes the mystery out of tip selection, allowing you to quickly match the right tip to the right material and surface for flawless results.
For the pro contractors we work with across San Luis Obispo, Paso Robles, Atascadero, and Santa Maria, picking the right tip means better results and happier clients. It doesn't matter if you're painting a house in Arroyo Grande or a commercial space in Templeton; mastering your tip chart is a must. To go even deeper, check out our complete contractor's guide to paint gun tip sizes for flawless finishes.
Matching Tip Size to Your Coating Material
Choosing the right sprayer tip for your paint or stain isn't just a suggestion—it's the absolute key to a professional finish. The material's viscosity, which is just a technical term for its thickness, is what tells you the orifice size you need. If you try to force thick paint through a tip that’s too small, you’re in for a bad time. It’s like trying to drink a milkshake through a coffee stirrer; you'll get constant clogs, a spitting spray pattern, and a whole lot of frustration.
On the flip side, using a tip that’s too big for a thin stain will just blast material everywhere, leading to runs, drips, and a ton of wasted product. The goal is to hit that sweet spot of perfect atomization, where the sprayer breaks the coating into a fine, even mist that lays down beautifully on the surface. Getting this balance right is what a good sprayer tip chart is all about.
Think of a sprayer tip chart as your go-to cheat sheet on the job. It helps you avoid expensive mistakes and ensures the paint performs exactly like the manufacturer designed it to. Whether you're a painter in San Luis Obispo tackling a new construction project or a contractor in Paso Robles refinishing kitchen cabinets, matching the tip to the material is a rule you can't afford to break.
The Science of Viscosity and Orifice Size
Thicker coatings, like latex paint or heavy-bodied elastomerics, need more muscle to push them through the sprayer and a bigger opening to get out. A larger orifice (think .017" to .025") keeps the pump from working overtime and lets the material flow without jamming up the tip.
For thinner stuff like lacquers, stains, and varnishes, the opposite is true. These materials flow easily, so you need a smaller orifice (like .009" to .013") to restrict the flow. This gives you way more control and stops the sprayer from flooding the surface with too much material, which is what causes those dreaded drips and a messy finish.
Pro Tip: Always check the paint can or the manufacturer's technical data sheet (TDS). Most will give you a recommended tip orifice size range and pressure setting. Sticking to those guidelines is the quickest path to a perfect finish.
For more specialized jobs, the details are even more critical. For instance, if you're applying something like concentrated liquid fertilizer, understanding the product's properties is essential for choosing a tip that delivers the right spray pattern for even coverage.
This image breaks down how a tip's code tells you its fan width and orifice size.
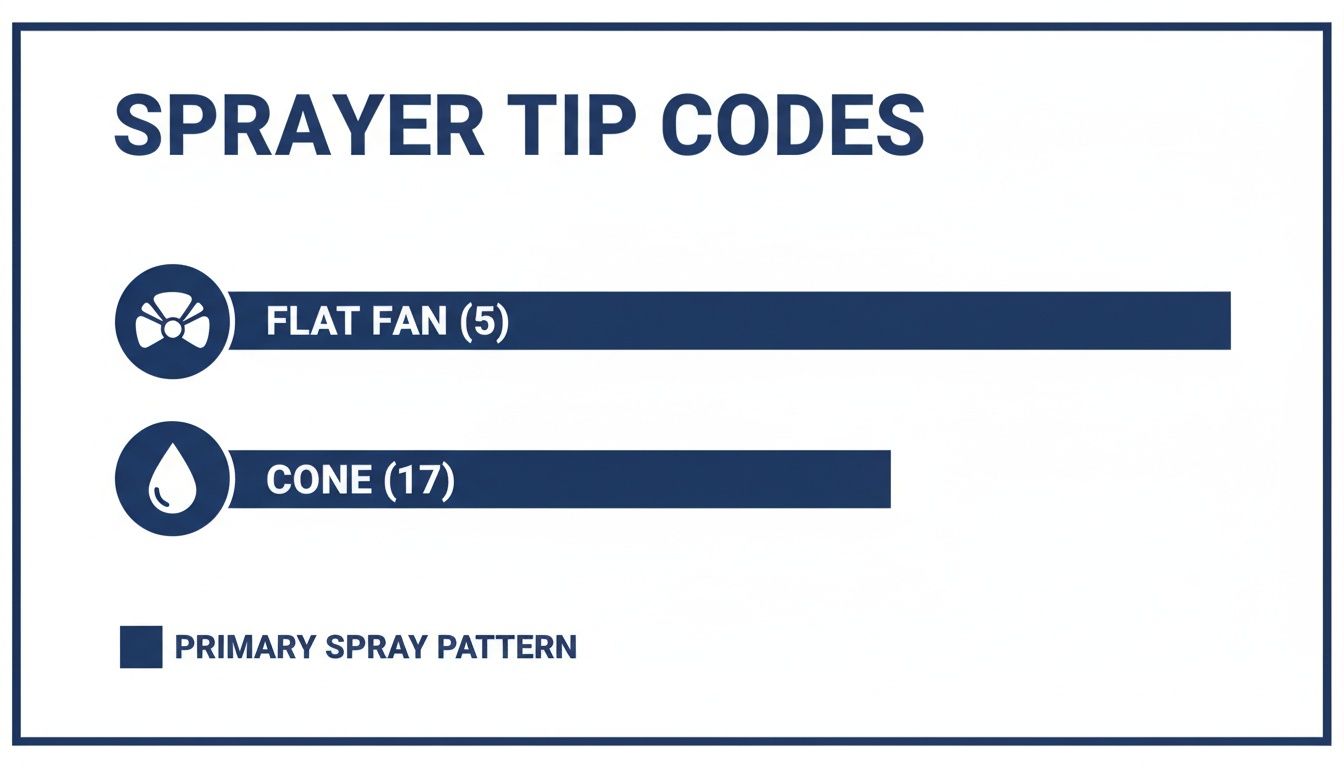
As you can see, the first number sets the fan size, and the last two numbers tell you the orifice diameter, which controls how much material comes out.
Sprayer Tip Recommendations By Coating Type
To make things easier for our clients in Atascadero, Arroyo Grande, and across the Central Coast, we put together this handy sprayer tip chart. It's built for quick lookups, whether you're on a residential job in Templeton or a big commercial project in Santa Maria.
Coating Type | Recommended Orifice Size (inches) | Common Tip Numbers | Suggested Pressure Range (PSI) | Best For |
|---|---|---|---|---|
Lacquers & Thin Stains | .009" – .013" | 211, 311, 413 | 1000 – 1500 | Fine finishing, cabinetry, furniture, trim |
Varnishes & Sealers | .011" – .015" | 313, 413, 515 | 1500 – 2000 | Woodwork, decks, fences, clear coats |
Oil-Based Enamels | .013" – .015" | 313, 415, 515 | 1800 – 2500 | Doors, trim, metal surfaces, high-durability finishes |
Interior Latex Paint | .015" – .019" | 415, 517, 519 | 1800 – 3000 | Walls, ceilings, broad interior surfaces |
Exterior Latex Paint | .017" – .021" | 517, 519, 621 | 2000 – 3300 | Siding, stucco, brick, broad exterior surfaces |
Elastomerics & Block Fillers | .023" – .035"+ | 525, 629, 631 | 2500 – 3500+ | Masonry, concrete, textured surfaces, waterproofing |
Using this sprayer tip chart as your starting point will save you a ton of time, cut down on wasted paint, and help you deliver the kind of professional results your clients expect. It's a must-have tool for any serious contractor.
How to Calculate Material Flow Rate for Any Job

Moving beyond guesswork is what separates the pros from the amateurs. When you can accurately calculate your material flow rate, you can bid jobs with confidence, stop worrying about running short on material, and nail the coating thickness the manufacturer intended. A good sprayer tip chart is your starting point, but knowing the formula behind it gives you the power to adapt to any job site condition.
The most important number here is Gallons Per Minute (GPM). This tells you exactly how much paint or coating is coming out of your sprayer, a figure that’s directly tied to your tip’s orifice size and the pressure you’ve set on the pump.
The Go-To GPM Formula
For bigger jobs, particularly in industrial or agricultural coatings, there’s a standard formula that helps you figure out the exact GPM needed to hit a specific application rate. This is gold for making sure you’re meeting job specs without wasting time or material.
The formula is: GPM = (GPA × MPH × W) / 5940
Let’s break down what each of those pieces means so you can put it to work:
GPM (Gallons Per Minute): The flow rate you need from a single nozzle. This is what you're trying to find.
GPA (Gallons Per Acre): Your target application rate. How much material are you supposed to put down over a certain area?
MPH (Miles Per Hour): How fast you're moving while spraying. Your ground speed.
W (Nozzle Spacing in Inches): This is just the width of your spray fan.
5940: This is a conversion constant. It’s a fixed number that makes all the different units (gallons, acres, miles, inches, minutes) play nicely together.
This isn't just for massive agricultural jobs. For painters here in San Luis Obispo and surrounding areas like Paso Robles and Atascadero, understanding this relationship helps you scale up for those big commercial exteriors or long stretches of fencing.
A sprayer tip chart is the bridge that connects this calculated GPM back to a real-world tip. Once you know you need 0.3 GPM, for instance, you can just look at the chart to find the tip orifice and pressure that will deliver it.
Putting It to Work
Let's imagine a painter in Arroyo Grande is tackling a large warehouse roof. The coating manufacturer says the application rate needs to be 20 GPA. The painter figures they can move at a steady 2 MPH and will use a tip that throws a 12-inch fan (W).
Time to plug it into the formula:
GPM = (20 × 2 × 12) / 5940
GPM = 480 / 5940
GPM = 0.08 GPM
With that number, the contractor just needs to grab a sprayer tip chart and find a tip that puts out about 0.08 GPM at a reasonable pressure. Boom—perfect application.
Sprayer tip charts are absolutely essential for figuring out flow rates with different pressures and speeds, which directly impacts your gallons per acre output. For our construction clients in Templeton or Santa Maria using Titan sprayers we service, this means nailing precise band spraying where the formula dictates the tip size. On a broader scale, using common 65° to 110° spray angles at nozzle heights of 15-24 inches is proven to optimize overlap and cut down drift by 18-30%. To dive deeper into how these calculations ensure compliant coatings, you can read the full research on sprayer calibration.
Brand Cross Reference Chart for Sprayer Tips
If you’re a professional painter, you know that brand loyalty only goes so far. Walk onto any job site from San Luis Obispo to Paso Robles, and you’ll see a mix of equipment—Graco, Titan, and Wagner sprayers all working together. That’s why a solid sprayer tip chart that cross-references brands isn't just helpful; it's an essential part of a pro's toolkit.
Picture this: your favorite Graco tip finally gives out right in the middle of a big project in Atascadero. The only supplier nearby stocks Titan. Instead of grinding to a halt, a quick cross-reference lets you find the equivalent tip, keep the paint flowing, and stay on schedule. No drama, no delays.
This is also a lifesaver for crews running different gear or grabbing equipment from a rental yard. It’s all about making sure everyone on the job can lay down a consistent, quality finish, no matter what color their sprayer is.
Navigating Proprietary Tip Technologies
While the three-digit numbering system is the universal standard we all rely on, the big brands have their own special sauce. Graco, for instance, has its RAC X Low Pressure (LP) tips, which are designed to atomize paint beautifully at up to 50% lower pressure. This is a huge deal for cutting down on overspray and making your tips last longer. On the other side, Titan offers its High-Efficiency Airless (HEA) tips, which deliver a similar low-pressure performance.
Understanding these differences is what separates the pros. You can’t just swap a standard Titan tip for a Graco LP tip and expect the same results, especially if your goal is to minimize overspray. To truly match the performance, you’d need to grab the Titan HEA equivalent.
For the contractors we work with in Templeton, Morro Bay, and Santa Maria, this is common knowledge. They know that matching a tip isn't just about the numbers; it's about matching the performance to get the job done right.
Quick Look-Up Sprayer Tip Equivalents
Here’s a straightforward cross-reference chart to help you find what you need across the industry’s top brands. Whether you're in the field or planning your next supply run, this will help you find a compatible option in a pinch.
Graco | Titan | Wagner | Common Tip Series |
|---|---|---|---|
RAC X (LP & FFLP) | TR1 (Standard) & HEA | Control Pro & TradeTip 3 | Fine Finish Low Pressure |
RAC V | SC-6+ Synergy | Flat Tip | Standard Professional Use |
XHD | Heavy-Duty | Heavy-Duty | Heavy Coatings & Protective |
This chart is a great starting point for matching sizes—a 517 is a 517 no matter the brand. But always remember to factor in the technology. If you're counting on the soft spray and minimal overspray from a Graco LP tip, make sure you grab the corresponding HEA tip from Titan to get that same performance.
Solving Common Sprayer Tip Problems
Even with the perfect sprayer tip chart in hand, things can still go sideways on the job. A flawless finish lives and dies by a clean, functioning tip. When problems pop up, you need to diagnose and fix them fast to keep downtime and rework from eating into your profits.
Most issues you'll run into trace back to just a few common culprits. Understanding these is the first step to maintaining that professional finish on every project. Whether you're a painter in San Luis Obispo or a contractor out in Paso Robles, knowing how to troubleshoot your sprayer tip will save you a world of frustration.
Diagnosing Uneven Spray Patterns
The most frequent complaint I hear is about a spray pattern that isn't full and even. This usually shows up as "fingering" or "tailing," where you get heavy bands of paint at the top and bottom of the fan with almost nothing in the middle. It's a dead giveaway that something's off.
Nine times out of ten, the root cause is simply insufficient pressure. The sprayer isn't working hard enough to atomize the paint properly, so it just streams out instead of forming that fine, even mist. The fix is usually easy: just crank up the pressure in small increments until the fingers vanish and you're left with a soft, consistent pattern. If more pressure doesn't solve it, your material might be too thick. In that case, you'll need to thin it down or jump up to a larger tip size.
Tackling Spitting and Clogging
A sprayer that "spits" blobs of paint instead of a smooth mist is another all-too-common headache. While this can sometimes be caused by air getting into the system, it’s often the first sign of a clog forming right inside the tip. A bit of debris in the paint or a dirty filter is all it takes to block that tiny orifice.
Here’s the quick field fix:
First things first, engage the safety on your spray gun.
Twist the tip 180 degrees into the reverse position.
Aim the gun at a piece of cardboard or another scrap surface and pull the trigger for a second. The pressure will force the clog right out the back.
Flip the tip back to its original position and give it a test spray.
This simple move clears most clogs in seconds without you having to take the gun apart. If you find yourself doing this constantly, it’s time to check your gun and pump filters to make sure they're clean and correctly sized for your material. For a deeper look at common sprayer issues, you can get more information by reading our comprehensive guide to Wagner paint sprayer troubleshooting.
Crucial Tip: A worn-out tip is the secret villain behind so many spray problems. As the orifice wears down with use, the fan width shrinks and the flow rate shoots up, wasting paint and wrecking your finish. If you’ve already tried adjusting the pressure and clearing clogs but still get a poor pattern, it's time to replace the tip. As a trusted service center for pros in Atascadero, Arroyo Grande, and Santa Maria, we can tell you firsthand that slapping on a fresh tip is the single easiest way to guarantee quality work.
Expert Sprayer Service in San Luis Obispo County
Having the perfect sprayer tip chart is a fantastic start, but even the best tip won't give you a professional finish if your sprayer is sputtering. Your machine is the heart of your operation. Keeping it in top condition is the only way to get the consistent pressure and steady flow rate you need for a flawless job, every single time.
At Contractor's Maintenance Service, we're the factory-authorized service center for Graco, Titan, and Wagner right here in San Luis Obispo County. Our whole mission is to keep your equipment running like it just came out of the box, cutting your downtime and boosting your bottom line. We get it—a broken-down sprayer brings a project to a dead stop.
Your Local Central Coast Equipment Experts
We’re proud to serve painting and coating professionals all across the Central Coast. Contractors have come to rely on our technicians for fast, knowledgeable service in:
San Luis Obispo
Paso Robles
Atascadero
Arroyo Grande
Templeton
Morro Bay
Pismo Beach
Grover Beach
Nipomo
Santa Maria
And all surrounding areas
From our home base in San Luis Obispo, we provide the kind of quick, reliable support you need to get the job done right. Being local means we understand the unique demands of projects in our community, from a residential repaint in a salty-air town like Morro Bay to a massive commercial build out in Paso Robles.
We’re not just a parts counter; we’re your partner in the field. Our team has the hands-on expertise to support your equipment needs, no matter the scale or complexity of the project.
Our factory-trained technicians are true masters of diagnostics. They can pinpoint and resolve even the trickiest equipment problems in a hurry. We handle it all, from routine preventative maintenance that keeps your sprayer running for years to urgent warranty repairs that get you back on the job fast. Your time is money, and we're here to provide real solutions, not just service.
Beyond just repairs, we offer expert consultations to help you dial in your entire setup. That includes helping you navigate a sprayer tip chart to find the perfect tip and accessory combo for whatever specialized coating you're up against. Our deep product knowledge means you'll leave with a system that's perfectly tuned for maximum efficiency and a superior finish.
To learn more about what we do, see why we are the go-to choice for airless sprayer repair near you in our contractor's guide.
Frequently Asked Questions About Sprayer Tips
Let's get straight to it. Here are the questions we hear all the time from pros on the job. Getting these answers right will make you a faster, smarter, and more profitable painter.
When Should I Replace My Sprayer Tip?
The honest answer? It depends on what you’re spraying and at what pressure. Abrasive coatings like latex are going to wear down a tip much faster than something thin like a stain. As a general rule, a standard tip will last for about 15-40 gallons of latex.
But forget the gallon count for a second. Your spray fan is the real indicator. If your fan width has shrunk by more than 25% or you’re getting ugly "fingers" or "tails" in your pattern that a pressure adjustment won't fix, it’s time to toss the tip. Pushing a worn tip just wastes paint and leaves you with a shoddy finish.
A worn 517 tip can easily start spraying like a 519 or even a 521. You'll be dumping way too much paint on the wall, leading to runs and a garbage finish. That’s a costly mistake on any job site, from Paso Robles to Santa Maria.
Can I Use One Sprayer Tip for All Paints?
Absolutely not. Trying to find a "one-size-fits-all" tip is one of the biggest mistakes you can make, and it will only lead to frustration and callbacks.
Thinner materials like lacquers and stains need a small orifice (like a .011") to atomize correctly into a fine mist. On the flip side, trying to push thick coatings like elastomerics through a small tip is a recipe for clogs. Those materials need a much larger orifice (think .025" or bigger) just to get out of the gun.
There's no shortcut here. Using a proper sprayer tip chart is the only reliable way to match your tip to your material. It’s how you get proper atomization, cut down on overspray, and deliver the kind of quality finish that keeps clients happy.
How Do I Clean a Clogged Tip?
Clearing a clog in the middle of a job is a basic skill every painter needs to master. The first rule: never, ever try to pick it clean with a wire or a nail. You’ll instantly destroy the precision-engineered orifice inside, and the tip will be useless.
Instead, just use the Reverse-A-Clean feature built into almost every modern tip guard. It’s fast and easy:
Put the gun's safety lock on. Don't skip this.
Twist the tip 180 degrees so it's pointing backward.
Aim the gun at a bucket or scrap piece of drywall and give it a quick pull of the trigger. The pressure will blow the clog right out.
Twist the tip back around to its normal spraying position, and you're good to go.
Knowing these quick fixes is essential for keeping the job moving, especially when you're managing projects across the Central Coast, from Templeton to Arroyo Grande. The core ideas of solid equipment maintenance apply everywhere. For instance, you can check out this comprehensive guide for farmers on agricultural spraying equipment to see how similar principles work in other fields.
For factory-authorized service and expert advice on your Graco, Titan, or Wagner gear in San Luis Obispo County, the team at Contractor's Maintenance Service has you covered. Check us out online or stop by the shop to keep your equipment running like new.