


The Ultimate Paint Spray Tip Chart for a Perfect Finish
- Jan 16
- 19 min read
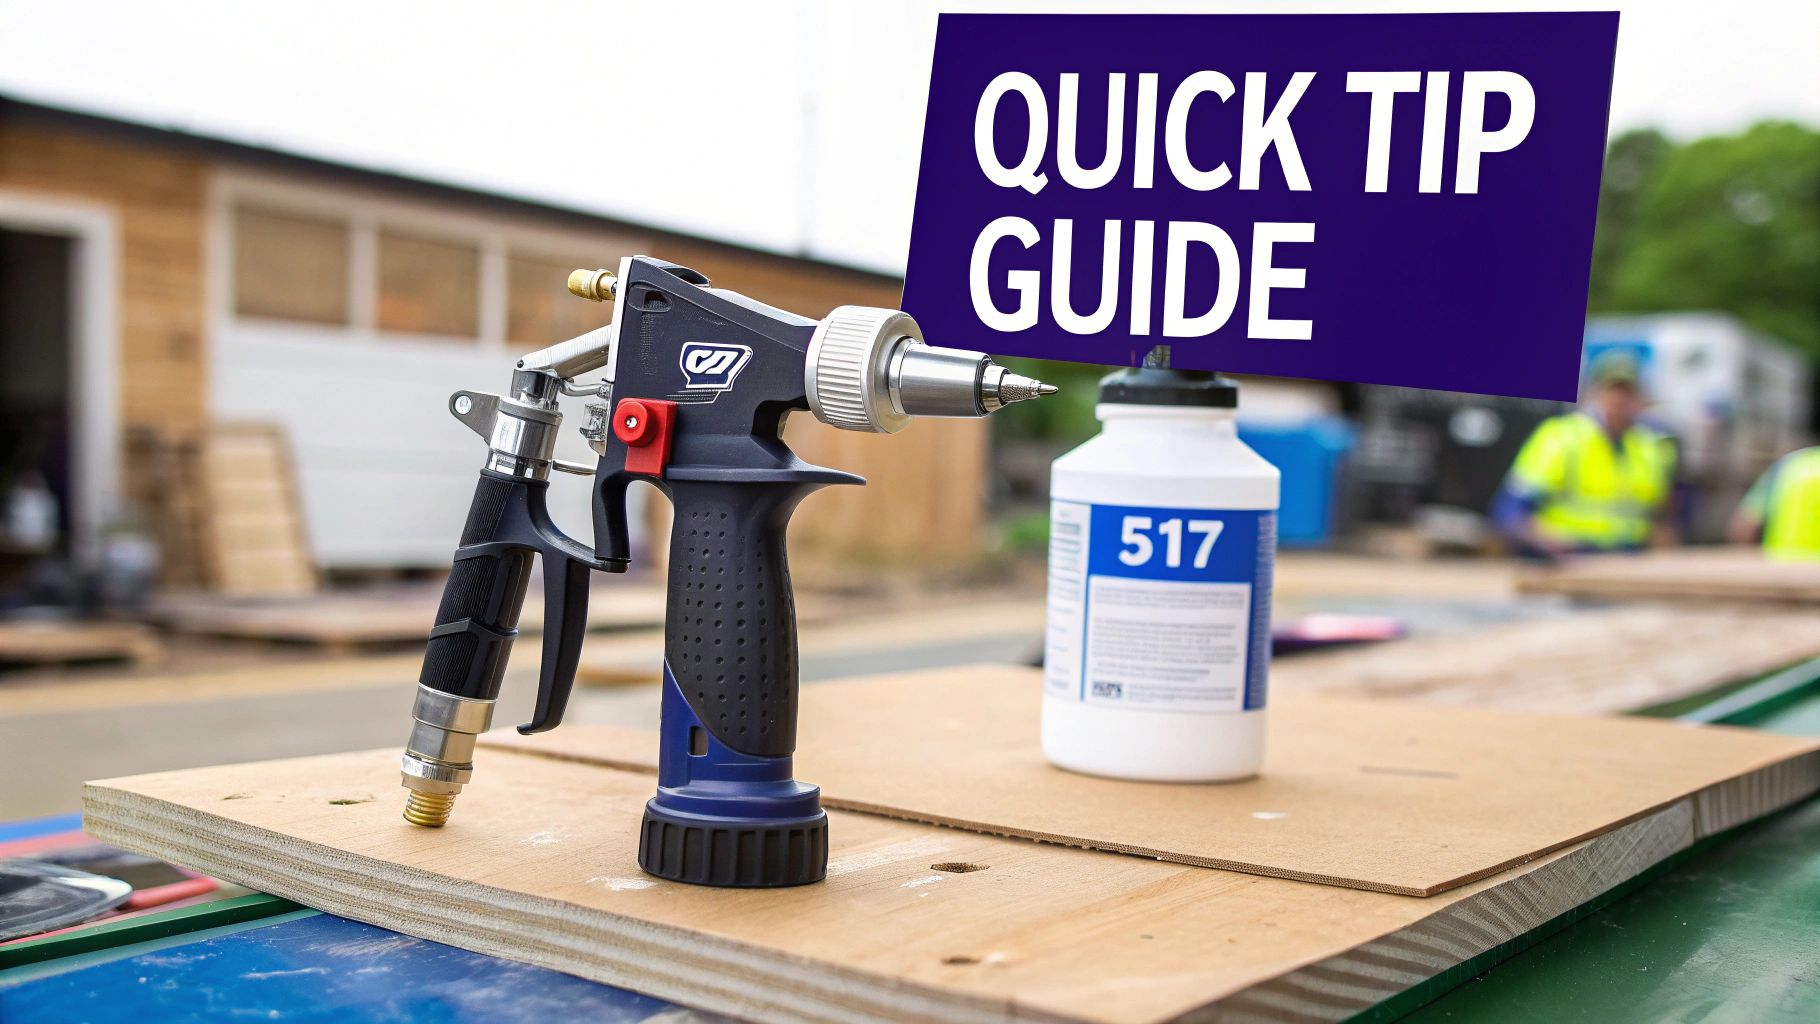
A good paint spray tip chart is a pro's best friend. It's the go-to reference for matching those three-digit tip numbers, like a 517, to the right coatings and fan widths for the job at hand. The system is pretty straightforward once you get the hang of it. The first digit (the 5) gets doubled to tell you the fan width—in this case, a 10-inch spray fan. The last two digits (the 17) give you the orifice size, which is 0.017 inches.
Mastering this simple code is key. It helps you pick the perfect tip for anything from thin stains to thick exterior latex, which means you get a better finish, use less material, and work a whole lot smarter.
Quick Guide To Selecting The Right Spray Tip
When you're out on a job, you don't have time to mess around. You need to grab the right tip and get spraying. This guide is designed to cut through the noise and give you a quick, reliable reference for making the right choice, fast.
Getting this simple system down is the first step toward that flawless, professional finish everyone wants. It helps you nail your technique, cut down on wasteful overspray, and boost your efficiency on every single project.
Decoding The Three-Digit Code
Every airless spray tip has a three-digit number stamped on it—think 211, 415, or 517. This little code is packed with information, telling you the two most important things you need to know about that tip.
Fan Width: Take that first digit and double it. That gives you the approximate width of the spray fan (in inches) when you're holding the gun about 12 inches from the surface. So, a 517 tip produces a 10-inch fan, which is perfect for covering large walls quickly.
Orifice Size: The last two digits tell you how big the opening is in thousandths of an inch. A 517 tip has a 0.017-inch orifice. This number is critical because it controls how much paint or stain flows through the gun.
Once you know this formula, you can size up any tip in your box. A 211 gives you a tight, 4-inch fan for precision work on trim, while a 619 lays down a wide 12-inch fan for maximum coverage on big surfaces like ceilings or siding. For more great advice, check out these exterior house painting tips for a perfect finish.
Matching Tips To Materials
Different coatings have different thicknesses, or viscosities, so they need different orifice sizes to atomize properly. If your tip is too small for the material, you'll be dealing with constant clogs. If it's too big, you'll waste paint and end up with drips and runs.
Here’s a general breakdown:
2xx/3xx Series (e.g., 311): These have smaller orifices, making them ideal for thin-bodied materials like stains, lacquers, and varnishes.
4xx/5xx Series (e.g., 517): This is your workhorse range. These mid-size orifices are perfect for most interior and exterior latex paints and primers.
6xx Series and larger (e.g., 621+): When you're spraying the thick stuff—like block fillers and elastomeric coatings—you need a larger orifice to handle the heavy-bodied material.
Spray Tip Quick Selection Chart
To make things even easier, here’s a quick-glance table that lines up common tip series with their typical uses. Think of it as your cheat sheet for grabbing the right tip on the fly.
Tip Number Series | Example Tip | Typical Fan Width | Orifice Size Range (Inches) | Common Materials |
|---|---|---|---|---|
2xx Series | 211 | 4 Inches | 0.009 - 0.011 | Stains, Sealers, Lacquers |
3xx Series | 313 | 6 Inches | 0.011 - 0.013 | Enamels, Polyurethanes, Light-Bodied Latex |
4xx Series | 415 | 8 Inches | 0.013 - 0.015 | Interior/Exterior Latex, Primers |
5xx Series | 517 | 10 Inches | 0.015 - 0.019 | Interior/Exterior Latex, Heavier Primers |
6xx Series | 621 | 12 Inches | 0.019 - 0.025+ | Elastomerics, Block Fillers, Dryfall |
Keep this handy, but always remember to double-check the paint can. The manufacturer's technical data sheet (TDS) is your ultimate guide and will always give you the recommended tip size for that specific product.
How To Read And Understand Spray Tip Numbers
Before you can even think about picking the right tip from a chart, you've got to learn to speak the language of the tips themselves. Every airless tip has a three-digit number stamped right on it—something like a 517 or 311. This isn't a random part number; it’s a smart, simple code that tells you the two most important things you need to know on the fly.
Getting this down is non-negotiable for any pro who wants a flawless, efficient finish. Once you nail this, you can pick the right tool for the job with confidence every single time. For an even deeper dive into getting that perfect finish, check out our guide on choosing the right tip size for airless sprayer finishes.
The First Digit: Fan Width
That first number is all about the fan width—how wide your spray pattern will be. The rule is simple: just double that number, and you've got your fan width in inches, assuming you're holding the gun about 12 inches from the wall.
A 2xx tip (like a 211) gives you a 4-inch fan (2 x 2 = 4). It’s perfect for tight, precise work on trim, window frames, or fence railings.
A 5xx tip (like a 517) makes a 10-inch fan (5 x 2 = 10). This is your workhorse, the go-to for most interior walls and exterior siding.
A 6xx tip (like a 621) produces a wide 12-inch fan (6 x 2 = 12). You'll want this for blasting out large, open areas like ceilings or the broad side of a commercial building.
Matching the fan width to the job is all about efficiency. Using a wide fan on a narrow surface just wastes paint and makes a mess with overspray. On the flip side, trying to paint a huge wall with a narrow fan will have you working all day.
The Last Two Digits: Orifice Size
Now for the last two numbers. These digits tell you the size of the hole, or orifice, the paint is coming through. The measurement is in thousandths of an inch, and it's what dictates your material flow.
The tip's orifice size has to match the thickness of the coating you're spraying. If you try to force a thick paint through a tiny hole, you'll be dealing with constant clogs and putting a ton of strain on your sprayer. Go too big with a thin material, and you’ll get nothing but runs and drips.
Think of it this way: a .011" orifice (from a 311 tip) is made for thin stuff like stains and lacquers, giving you fine control. But if you're spraying thick block filler, you'll need a much larger .021" orifice (from a 621 tip) to get the material out smoothly without clogging. This is the kind of practical knowledge that painters from San Luis Obispo to Paso Robles and Santa Maria count on to get the job done right.
The Complete Paint Spray Tip Chart by Material
Ask any seasoned pro, and they'll tell you: picking the right spray tip for the material you're using is probably the single most important decision you'll make on a job. It's the difference between a flawless finish and a complete mess. Different coatings have wildly different viscosities—from watery lacquers to block fillers thick as mud—and each one demands a specific orifice size and fan width to atomize correctly.
This section is designed to be your go-to reference chart. We’ve broken it down by the most common coating types to give you a solid starting point for any project. Get this right, and you'll minimize overspray, say goodbye to constant clogs, and lay down the perfect film thickness every time.
First, let's decode those numbers on the tip itself. This diagram shows how a tip's three-digit code tells you everything you need to know about its fan width and orifice size.
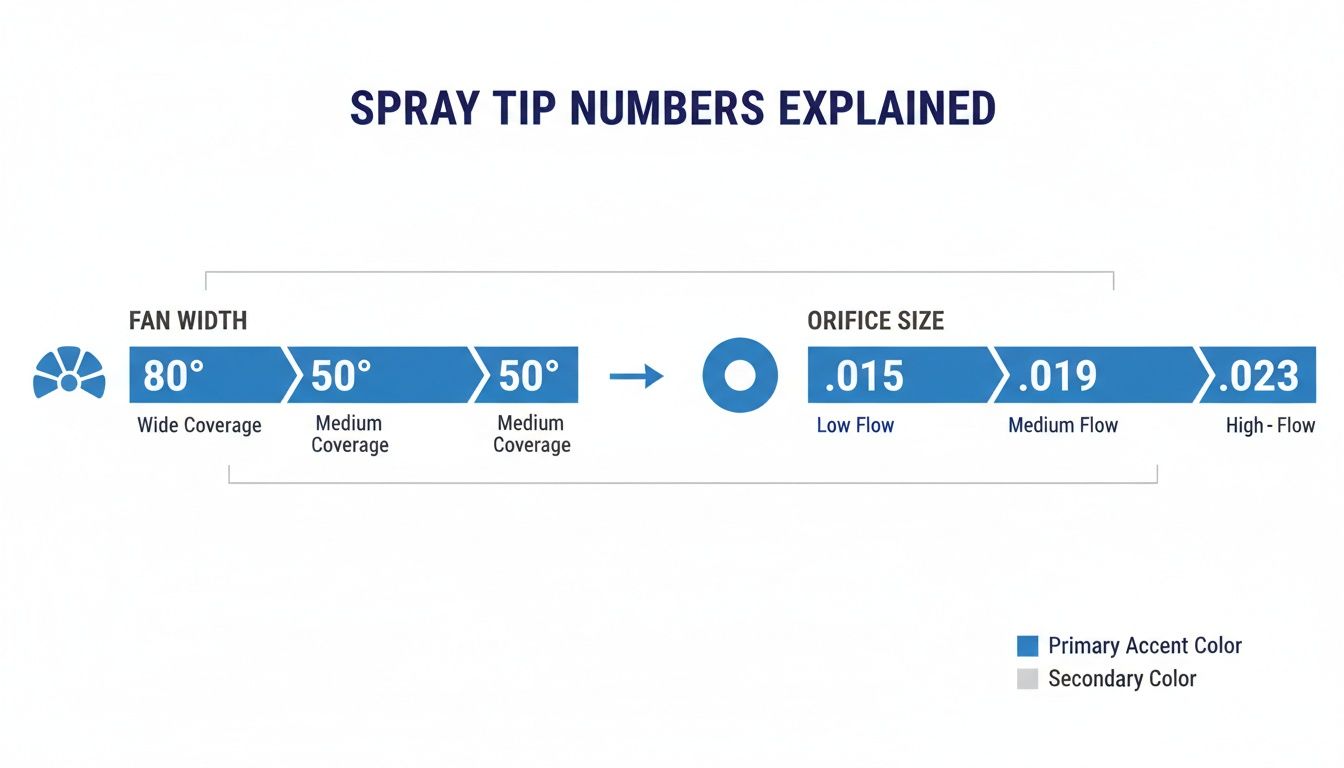
As you can see, the first digit corresponds to the spray pattern's width, while the last two digits control the flow of material. It’s a standardized system that makes life easier for pros everywhere.
Primers, Sealers, And Stains
Lighter-bodied materials like stains, lacquers, and sealers need a smaller orifice. If you try to push these thin liquids through a large hole, you'll get way too much material coming out at once, leading to runs, drips, and a lot of wasted product. A small orifice gives you that fine, even mist you're looking for.
Lacquers, Varnishes, and Sealers: Stick with a .009" – .013" orifice. Think tips like a 209, 311, or 313. These smaller sizes give you incredible control, which is exactly what you need for fine-finish work.
Stains (Transparent and Semi-Transparent): A .011" – .013" orifice is your sweet spot here (e.g., 311, 313 tips). A 6-inch fan (any 3xx series tip) usually offers a great balance between coverage and precision.
Standard Primers (Latex/Acrylic): For most general-purpose primers, a versatile .015" – .017" orifice (like a 415 or 517 tip) is your best bet.
Interior and Exterior Latex Paints
This is the bread and butter for most residential and commercial painters. The classic 517 tip is a workhorse for a reason—it gives you a 10-inch fan and a .017" orifice, which is just about perfect for blasting out broad wall surfaces with standard latex paint. Of course, different situations call for different tools.
For a deeper dive into paint types and how they behave in a sprayer, check out our contractor's guide to airless paint sprayer paint.
Interior Latex (Walls and Ceilings): You'll typically want a .015" – .019" orifice (e.g., 515, 517, 519 tips). A wider 10-12 inch fan will help you fly through large, open walls.
Exterior Latex (Siding): Exterior-grade paints are often a bit thicker, so it's common to step up to a slightly larger .017" – .021" orifice (e.g., 517, 519, 621 tips).
Heavy-Bodied and Industrial Coatings
When you get into the really thick stuff like epoxies and elastomeric coatings, you need a much larger orifice and more pressure to get the material to flow correctly. If you try to use a standard latex tip here, you'll be dealing with constant clogging and putting a ton of strain on your sprayer.
Elastomeric Coatings: These demand a large .021" – .035" orifice. Look for tips like the 521, 625, or 631.
Block Fillers: For these, you'll need the largest orifices available, usually in the .025" – .035" range (e.g., 525, 629, 535 tips).
Epoxies and Urethanes: The right orifice size depends heavily on the solids content of the specific product, but it often falls between .017" – .025". Your best bet? Always check the manufacturer's technical data sheet.
To make things even easier, here’s a detailed chart that lines up common materials with the tips and settings you’ll need to get the job done right.
Detailed Spray Tip Recommendations by Coating Type
Coating Material | Recommended Orifice Size (Inches) | Common Tip Series | Optimal Pressure Range (PSI) | Application Notes and Best Practices |
|---|---|---|---|---|
Lacquers & Varnish | .009" – .013" | 209, 311, 313 | 1200–1800 | Use a smaller fan width (4-6") for fine control on trim and cabinets. Maintain a consistent distance to avoid runs. |
Stains (Transparent) | .011" – .013" | 311, 313 | 1000–1500 | Lower pressure helps prevent overspray and ensures even penetration into the wood. Back-brushing may be required. |
Sealers & Primers | .013" – .017" | 313, 415, 517 | 1500–2500 | A versatile range. Use a 515 or 517 for broad surfaces like drywall. Adjust pressure to achieve a full, even spray pattern. |
Interior Latex Paint | .015" – .019" | 515, 517, 519 | 1800–2500 | The 517 is the industry standard for walls. For ceilings, a wider 619 can speed up the process significantly. |
Exterior Latex Paint | .017" – .021" | 517, 519, 621 | 2000–3000 | Thicker exterior paints need a slightly larger orifice and higher pressure. A wider fan (12") is ideal for siding. |
Epoxies & Urethanes | .017" – .025" | 517, 519, 521 | 2500–3500+ | Always consult the manufacturer's data sheet. Viscosity varies greatly. Higher solids require a larger orifice. |
Elastomeric Coatings | .021" – .035" | 621, 625, 631 | 2800–4000 | These thick coatings require high pressure and large orifices to avoid clogging and ensure proper film build. |
Block Fillers | .025" – .035" | 525, 629, 535 | 3000–4000 | The largest tips are needed here. Remove filters from the gun and manifold to prevent blockages with these heavy materials. |
This chart should serve as a reliable guide, but remember that real-world conditions like temperature and humidity can affect paint viscosity. Don't be afraid to test your pattern on a piece of cardboard and make small adjustments to your pressure or tip size to dial in that perfect finish.
A Guide to Cross-Brand Tip Compatibility
When you're running gear from different manufacturers like Graco, Wagner, and Titan, figuring out which tips work with which guns can feel like a puzzle. The good news is, you're not as locked into one brand as you might think.
While most professional spray guns use a universal 7/8" thread—letting you swap entire guard assemblies between brands—the tips themselves aren't one-size-fits-all across different guards. The real key to compatibility isn't the gun or the tip, but the tip guard.
For example, you can't just pop a Graco tip into a Titan guard. The way they seat is totally different. However, you can absolutely thread a complete Graco RAC X guard assembly, with its tip, onto a Titan or Wagner gun. This flexibility is a huge win for pros who own a mix of equipment. It means you aren't stuck buying consumables from just one manufacturer.
Understanding Guard Systems and Specialty Tips
Each major brand has its own flagship guard and tip system, and each one is engineered for slightly different performance benefits. Knowing the lay of the land helps you pick the right combo for the job, whether you're working in San Luis Obispo, Atascadero, or Arroyo Grande.
Graco RAC X (Reverse-A-Clean): This is pretty much the industry standard, and for good reason. Its design lets you clear clogs in seconds by just twisting the tip 180 degrees. Graco also really led the charge with their Fine-Finish Low-Pressure (FFLP) tips, which give you a glass-smooth finish at up to 50% lower pressure. That means less overspray and longer tip life.
Titan TR1: This is Titan’s workhorse reversible tip line. They're known for being tough as nails and throwing a consistent, reliable fan pattern, making them a solid choice for a huge range of coatings.
Wagner HEA (High-Efficiency Airless): Wagner’s HEA ProTip system is another game-changer in low-pressure spraying. They promise a softer, feathered spray pattern with up to 55% less overspray compared to old-school tips, which is perfect for interior and exterior work where control is everything.
The real advantage of modern systems like Graco FFLP and Wagner HEA is their ability to fully atomize paint at a much lower PSI. This doesn't just save a ton of paint; it also reduces wear and tear on your sprayer’s pump—a critical point for busy contractors in places like Paso Robles and Pismo Beach.
Cross-Brand Tip Conversion
So, can you swap a "517" from one brand for another? Yes and no. While a direct, one-for-one swap isn't always perfect because of each brand's unique design, the numbering system is universal. A "517" tip from Graco, Titan, or Wagner will always give you a 10-inch fan and have a 0.017" orifice.
The real difference is in the technology behind the tip. For painters looking to get the benefits of low-pressure spraying, a Graco FFLP or LP tip is the direct equivalent of a Wagner HEA tip. For a more detailed breakdown of specific sprayer models and their capabilities, our Graco airless sprayer comparison guide is a great resource.
Having this knowledge in your back pocket ensures that no matter your brand loyalty, from Morro Bay to Santa Maria, you can find the right tip to lay down a flawless finish every time.
How to Know When It's Time to Replace Your Spray Tip
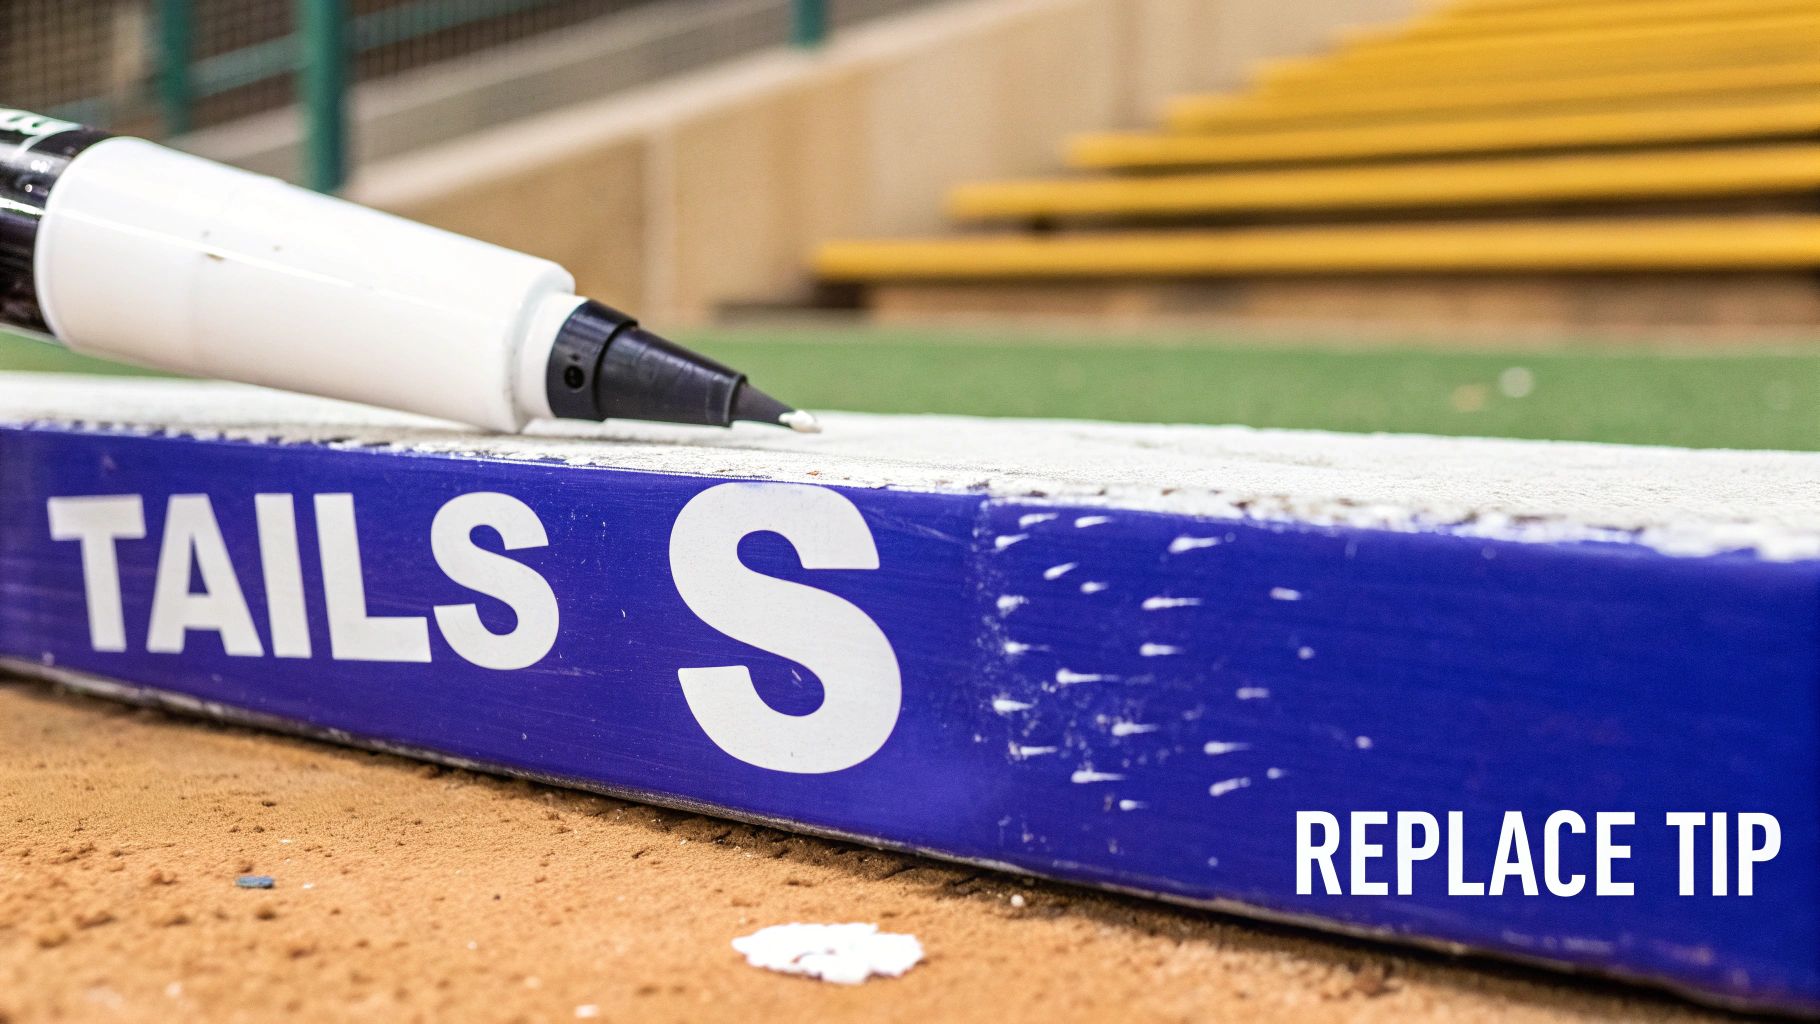
A worn-out spray tip is more than just an inconvenience—it’s a direct hit to your wallet and the quality of your finish. Over time, the abrasive solids in paint slowly grind away at the tip’s tungsten carbide orifice. The hole gets bigger, the edges round off, and suddenly your perfect spray pattern is gone, replaced by a mess that wastes paint and costs you time.
Learning to spot the signs of a worn tip is one of the most important skills a pro painter can have. A fresh tip lays down a soft, even, beautifully defined spray pattern. But as it wears, that pattern breaks down, leading to costly problems and a subpar finish that’s a bad look for your business.
Visual Cues of a Worn Tip
The most obvious sign of a worn tip is a fan pattern that's starting to fall apart. Instead of that consistent, even coat you’re used to, you’ll start seeing tell-tale problems that are impossible to miss once you know what you’re looking for.
A quick spray test on a piece of cardboard tells you everything. Keep an eye out for these classic indicators:
Shrinking Fan Width: A brand-new 517 tip is supposed to deliver a 10-inch fan. As it wears out, you might only be getting a seven or eight-inch fan, forcing you to make extra passes just to get the same coverage.
Developing 'Tails' or 'Fingers': This is the dead giveaway. You’ll see heavy bands of paint forming at the top and bottom edges of your spray pattern, with a starved, thin coat in the middle.
Uneven Coverage: The spray becomes blotchy and inconsistent. You’re left with a finish that isn't uniform, which usually means you have to back-roll or apply another coat to fix it, burning up time and labor.
These issues aren't just cosmetic; they have a real financial impact. A worn tip can't atomize the paint correctly, resulting in bigger droplets and less material actually making it to the surface.
The Financial Cost of a Worn Tip
Pushing a worn tip past its prime is a costly mistake. As the orifice gets bigger and the fan pattern shrinks, you’re basically dumping more paint onto a smaller area just to try and achieve coverage. It's incredibly inefficient and can easily increase your paint consumption by 20% or more.
A worn tip that shrinks a 10-inch fan down to 7 inches makes you work 30% harder and use 30% more paint to cover the same surface. Over a big project, that wasted material adds up fast.
For our clients in San Luis Obispo, Paso Robles, and Santa Maria, keeping material costs in check is how you stay competitive. Swapping out a worn tip is one of the cheapest and easiest ways to control your expenses. As a rule of thumb, most manufacturers suggest replacing a tip after spraying 15-40 gallons of latex. Sticking to that simple guideline ensures you keep spraying at peak performance, deliver consistent quality, and protect your bottom line.
Troubleshooting Common Spray Pattern Issues
Even when you’ve picked the perfect tip from a paint spray tip chart, things can still go sideways out on the job. A clean, even spray pattern is a delicate balance. It depends on the right pressure, the viscosity of your material, and the condition of your gear. Knowing how to diagnose and fix problems on the fly is what separates the pros from the rookies—it saves you time and prevents costly rework.
Think of this section as your field guide for troubleshooting the most common spray pattern headaches. Whether you’re a seasoned pro in San Luis Obispo or just starting out in Paso Robles, getting these steps down will help you deliver a flawless finish every single time.
Diagnosing and Fixing 'Tailing'
The most frequent problem painters run into is "tailing," sometimes called "fingers." You'll know it when you see it: heavy lines of paint form at the top and bottom edges of your spray pattern, with a thinner coat in the middle. This almost always means one thing—your paint isn't atomizing properly.
Here’s how you can sort it out:
Crank Up the Pressure: The simplest fix is often the best. Try gradually increasing your sprayer's PSI in small bumps. Watch the pattern and stop once the tails disappear, leaving you with a full, soft spray.
Thin Your Material: If more pressure doesn't do the trick, or you're already maxed out, your paint might be too thick to atomize. Following the manufacturer’s guide, thin the material just enough to get it flowing smoothly.
Check for a Worn Tip: A tip that has seen better days is a common culprit. As the orifice wears out and gets larger, it just can't atomize paint effectively at normal pressures anymore. If you suspect your tip is worn, just swap it out for a fresh one.
Solving Spitting and Uneven Patterns
Spitting is when your sprayer decides to hock little blobs of paint instead of spraying a fine, consistent mist. It’s frustrating and can ruin a perfectly good surface. Usually, this is caused by air getting into the system or a small, temporary blockage.
Here's how to tackle spitting:
Check for Clogs: A tiny piece of debris can get lodged in your tip and cause all sorts of chaos. The fix is easy. Just use the reversible feature on your tip guard to spin the tip 180 degrees, aim the gun at some cardboard, and pull the trigger. That quick blast of pressure should blow the clog right out.
Inspect Your Filters: A dirty or clogged gun filter (or manifold filter) is another prime suspect. When a filter gets gummed up, it restricts paint flow, causing pressure to drop and the gun to spit. Make it a habit to clean or replace your filters regularly.
Ensure Proper Viscosity: Just like with tailing, paint that’s too thick can also lead to spitting. Double-check that your material is thinned correctly for your sprayer and tip size.
For our professional clients across the Central Coast, from Atascadero to Arroyo Grande and Pismo Beach, nailing the diagnosis quickly is everything. An uneven pattern often points straight to a worn tip, whereas spitting is more likely a clog or a dirty filter.
Painters in Morro Bay and Santa Maria have found that keeping a simple log of how many gallons have gone through each tip can help predict when it’s nearing the end of its life. This simple trick helps you prevent pattern problems before they even start.
Your Local Equipment Partner in San Luis Obispo County
A spray tip chart is a great starting point, but let's be honest—what really keeps a job moving is having the right gear and solid local support when you need it. For painting pros here on California's Central Coast, that's where Contractor's Maintenance Service comes in. We’re the dedicated equipment partner you can count on for the parts, know-how, and service that keep you delivering top-notch results, job after job.
Our home base is right here in San Luis Obispo, and we proudly serve the entire heart of the Central Coast. Whether you're a contractor in Paso Robles, Atascadero, or Arroyo Grande, we've got you covered. From coastal projects in Pismo Beach and Morro Bay to jobs further south in Santa Maria, our team is always ready to jump in and help.
Authorized Sales and Service You Can Trust
We're an authorized service center for the biggest names in the business, like Graco and Wagner/Titan, which means we do a lot more than just sell equipment. We keep a full stock of spray tips, parts, and accessories on hand so you can find exactly what you need without waiting around. Less downtime for you means more time getting the job done.
Our services are built to support your equipment from the day you buy it to the day you retire it:
Expert Selection: Not sure which tip from our chart is the right match for your sprayer and coating? Our team has seen it all and can give you practical advice to make sure you walk out with the right component for the job.
Urgent Repairs: When a sprayer goes down, the clock is ticking. We provide fast diagnostics and repairs to get your equipment back on the job site quickly, keeping your schedule on track.
Preventive Maintenance: The best way to deal with a breakdown is to prevent it from happening in the first place. Our scheduled maintenance keeps your gear running at peak performance and extends the life of your most valuable tools.
For any contractor, reliability is non-negotiable. Having a local partner who gets your equipment and understands the pressure you're under is a huge advantage for keeping jobs on schedule and profitable.
Stop by our SLO shop for some in-person help, or if you're further out, take advantage of our nationwide shipping for parts and equipment. At Contractor's Maintenance Service, our goal is simple: to provide the dependable solutions that keep your business moving forward. We're here to be the go-to resource for painting professionals throughout San Luis Obispo County and beyond.
Answering Your Top Questions About Paint Spray Tips
Working with a paint spray tip chart brings up a lot of questions, especially when you're on a job site and just need a straight answer. We get it. Here are some of the most common things we hear from pros, broken down to help you fine-tune your setup, stop wasting paint, and nail that perfect finish every time.
What Happens If My Spray Tip Is The Wrong Size?
Using the wrong size tip is a fast track to problems, hitting both your finish quality and your wallet. It really depends on whether the tip is too small or too big for the paint you’re pushing.
Tip Orifice is Too Small: This is the number one reason for constant clogging. It also makes your sprayer's pump work way too hard, which leads to early wear and tear on your equipment. The finish usually looks terrible and spotty because the paint just can't atomize the right way.
Tip Orifice is Too Large: This is how you waste a ton of paint, fast. The sprayer dumps out way too much material, leaving you with runs, sags, and a storm of overspray. Not only does it ruin the look, but it also adds a mountain of cleanup time and blows up your material budget.
The fan width is just as critical. A fan that’s too narrow on a big wall will slow you down and create obvious lap lines. On the other hand, using a fan that’s too wide for trim is just asking for a mess of overspray. Following a good paint spray tip chart is the best way to guarantee a quality job, work efficiently, and keep your gear running for years.
How Do I Set The Right Pressure For My Airless Sprayer?
Finding that sweet spot for pressure is a balancing act. It depends on the paint, the tip size you're using, and even how long your hose is. The golden rule is simple: always start low and only turn up the pressure as much as you need.
Kick things off with your sprayer on its lowest pressure setting. Spray a test pattern on some cardboard or a hidden spot. If you see "tails" or "fingers"—those heavy lines on the top and bottom of your spray fan—it’s time to dial up the pressure.
Slowly increase the PSI, just a little at a time, until those tails vanish and you're left with a full, soft, even pattern. Any pressure beyond that point is just overkill. It won't make your finish any better, but it will crank up the overspray, wear out your tip faster, and put a lot of extra strain on your pump.
A quick tip: Newer tips, like the Graco FFLP or Wagner HEA series, are designed to give you a perfect finish at much lower pressures. For our customers from San Luis Obispo to Paso Robles, switching to these is a no-brainer for saving paint and making their sprayers last longer.
Can I Use A Graco Tip With A Wagner Sprayer?
We hear this one all the time. The answer isn't about the gun, but the tip guard. Most professional spray guns from the big names like Graco, Wagner, and Titan use a universal 7/8" thread. That means you can often swap the entire guard assembly from one brand's gun to another.
So, for instance, you can usually screw a complete Graco RAC X guard (with the Graco tip inside) right onto a Titan or Wagner gun. What you can't do is pop just the Graco tip into a Titan guard. The way the tips seat inside the guard is different.
Here at Contractor's Maintenance Service, we help painters from Atascadero to Santa Maria get the right guard and tip combo for any sprayer they own, ensuring everything fits perfectly and works like it should.
What Is The Best Way To Clean Spray Tips?
Good cleaning habits are the single best thing you can do to get the most life and performance out of your tips. You have to clean them right after you’re done spraying—once the paint dries, it’s almost impossible to get off without wrecking the tip.
Here’s a straightforward and effective cleaning routine:
Flush It Out: While you're still set up to spray, just turn the tip to the reverse position and give it a quick blast to clear out any gunk. This initial flush gets rid of most blockages.
Solvent Clean: Once you're done, take the tip and guard off the gun. Give them a good cleaning with the right solvent. That means water and a soft-bristle brush for latex and acrylics, or mineral spirits for oil-based paints.
Don't Damage It: Never, ever use a wire brush, a needle, or anything hard to poke at the orifice. You’ll scratch the tungsten carbide, which will permanently ruin the tip and your spray pattern.
Cleaning your tips immediately and gently makes sure they’re ready to go for the next job and helps you get every bit of value out of your investment.
For expert advice on picking the right spray tips or for fast, reliable equipment service on the Central Coast, Contractor's Maintenance Service has you covered. Visit us online or stop by our San Luis Obispo shop to get the parts and support you need to keep your projects on track.


Comments