


Switch for air compressor: Your Complete Guide to Safer, Efficient Operation
- Jan 22
- 17 min read
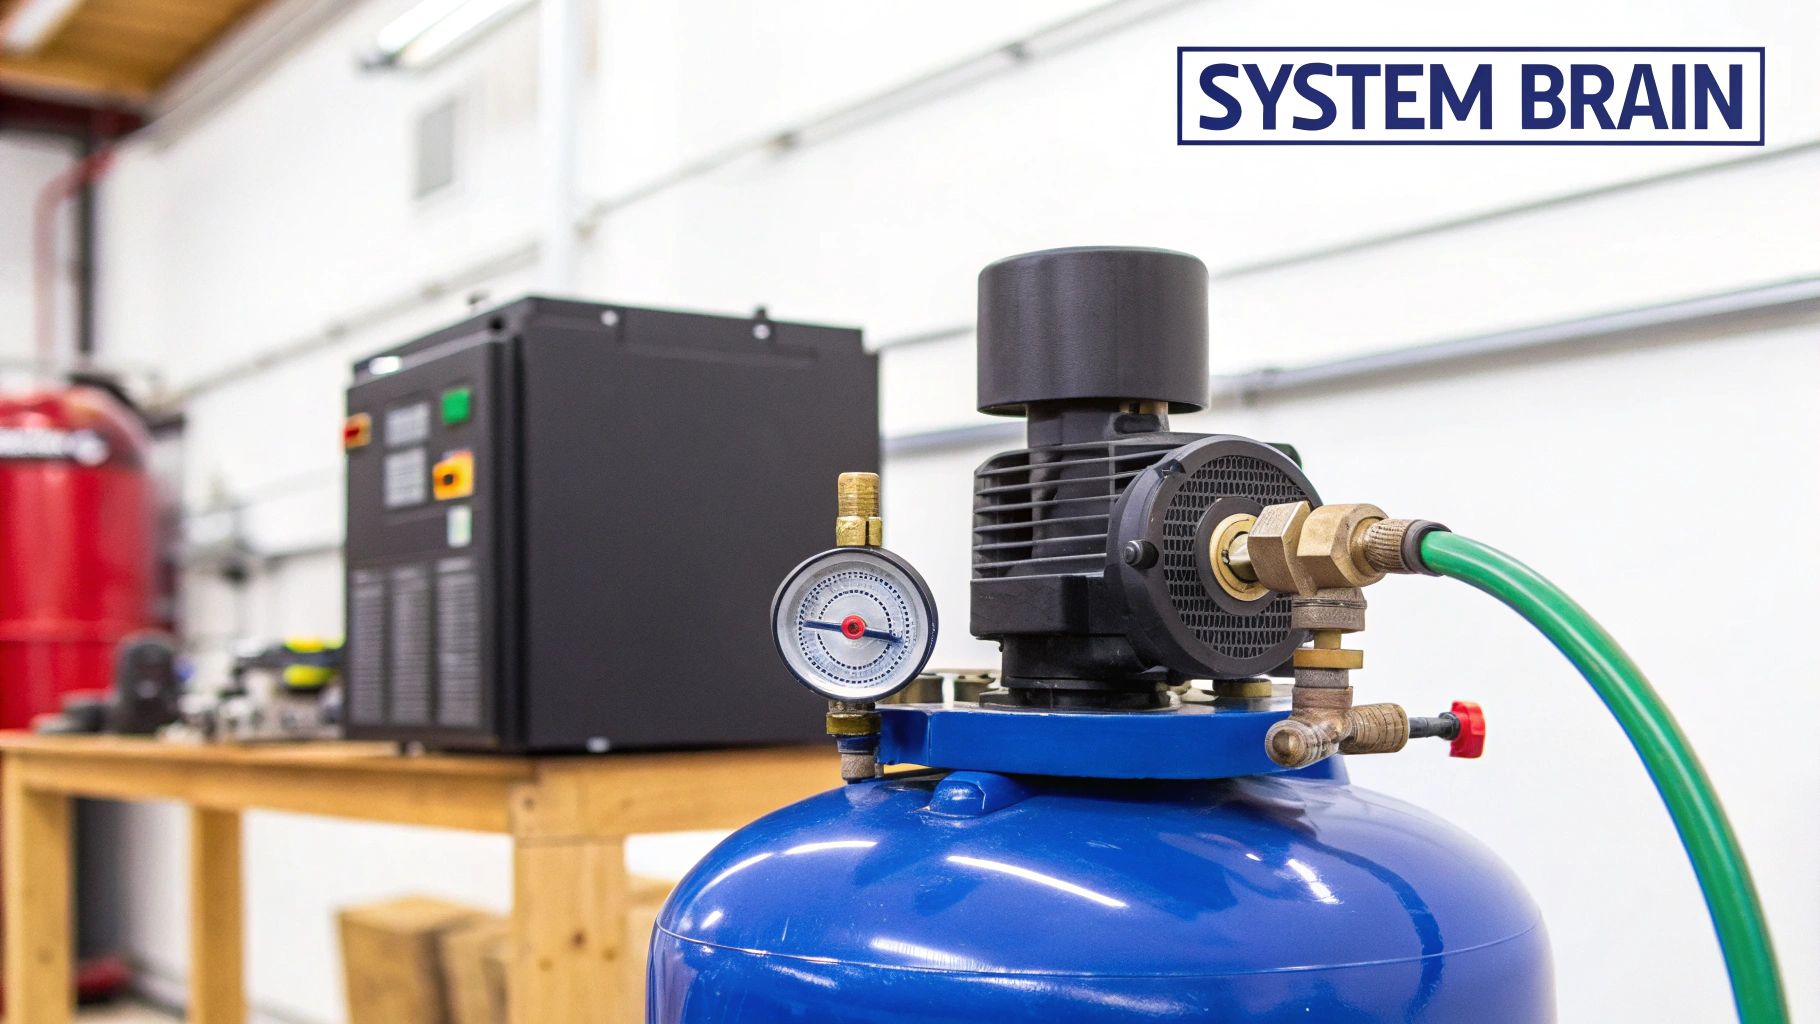
Think of the air compressor switch as the unsung hero of your pneumatic system. It's the automatic manager that tells the compressor motor when to kick on and when to take a break. By constantly reading the pressure inside the air tank, it signals the motor to start building pressure when it's low and shuts it off once it hits the preset limit. Getting this part right is the difference between a tool that just works and one that quits on you mid-job.
The Brain of Your System
A good way to understand the switch for air compressor is to compare it to the thermostat in your house. Just like a thermostat maintains a comfortable temperature, the pressure switch keeps the air in your tank within a specific, usable range. Without it, your compressor would either run until something gave out, or it would never turn on at all. It's that fundamental to both the safety and efficiency of your setup.
Its main job is to automate the whole pressure cycle. This ensures your tank is always charged and ready for work without you having to stand there and watch it. It also prevents dangerous over-pressurization and keeps your energy bill from getting out of hand. That simple automation is what makes modern air compressors so reliable.
Understanding the Core Function
At its heart, the switch works on a simple principle using what we call "cut-in" and "cut-out" pressures. The cut-in pressure is the low point that tells the motor, "Hey, time to get to work." The cut-out pressure is the upper limit that signals the motor to stop.
Cut-In Pressure: The PSI level where your compressor kicks on to refill the tank.
Cut-Out Pressure: The maximum PSI before the motor shuts off.
For example, a common factory setting is a 90 PSI cut-in and a 120 PSI cut-out. When you use an air tool and the tank pressure drops to 90 PSI, the switch closes an electrical circuit, firing up the motor. The compressor runs until the tank hits 120 PSI, then the switch opens the circuit and stops the motor. This cycle happens over and over, giving you consistent, on-demand airpower.
The pressure switch is more than just an on/off button; it's the component that guarantees your system operates within safe, effective limits, protecting the motor from burnout and the tank from excessive strain.
Why the Right Switch Matters for Central Coast Professionals
For any contractor or industrial shop here on California's Central Coast, reliable equipment isn't a luxury—it's a necessity. Whether you're running a paint sprayer in Paso Robles, using pneumatic tools on a job site in Atascadero, or keeping machinery running in an Arroyo Grande workshop, equipment failure means lost time and lost money.
Choosing the correct switch for air compressor is critical for the longevity of your machine. A mismatched switch can lead to poor tool performance, motor damage, or even serious safety hazards. That's why having access to the right parts and solid advice makes all the difference. We're proud to serve our local communities, providing hands-on support for professionals throughout San Luis Obispo and its surrounding areas, including:
San Luis Obispo
Paso Robles
Atascadero
Arroyo Grande
Grover Beach
Pismo Beach
Morro Bay
Nipomo
We know the demands local professionals face, and we're here to help you find the perfect component to keep your operation running without a hitch.
Decoding the Different Types of Compressor Switches
When you hear the term switch for air compressor, it’s easy to think of a single part. In reality, it’s more like a small, specialized team working in sync. Each component has a unique job, and if one stumbles, the whole system can grind to a halt. Getting to know their individual roles is the first real step toward smart troubleshooting and maintenance.
Let’s take a look at the different jobs these switches do, so you can tell them apart and understand what they bring to the table.
Air Compressor Switch Types at a Glance
This quick table breaks down the main types of switches you'll find on an air compressor, what they do, and where you'll see them in action.
Switch Type | Primary Function | Common Application Scenario |
|---|---|---|
Pressure Switch | Monitors tank pressure; turns the motor on and off. | The main control for cycling the compressor to maintain pressure. |
Unloader Switch/Valve | Vents trapped air between the pump and tank. | Eases motor startup by releasing backpressure after a cycle. |
Thermal Overload Switch | Senses motor temperature and cuts power if it overheats. | Protects the motor from burnout during heavy use or in hot weather. |
Manual Toggle/Rocker | The main on/off control for the entire unit. | The master switch you use to power the compressor on or off. |
Float/Tank Drain Switch | Automatically purges water from the tank. | Prevents rust and moisture buildup in humid environments. |
Now, let's dive a little deeper into how each of these critical components keeps your compressor running safely and efficiently.
The Pressure Switch: The Brains of the Operation
The pressure switch is the director of the whole show. Think of it as the compressor's brain, constantly monitoring the air pressure inside the tank. Its entire purpose is to be the primary on/off control, telling the motor precisely when to start and when to stop.
This single component is the silent guardian that keeps your system operating within a safe and effective pressure range. It automatically cuts power when the tank hits its upper limit, preventing dangerous over-pressurization and saving your motor from burnout. It’s a simple device, but it’s so critical that it’s fueling a global market projected to jump from around $1.5 billion in 2025 to $3.7 billion by 2033. Here in North America, strict safety standards make these switches mandatory, and for good reason—they can cut downtime by up to 30% in industrial settings.
The Unloader Valve: Giving the Motor a Break
Working hand-in-hand with the pressure switch is the unloader valve. This is an often-overlooked but absolutely essential part that makes the motor's life a whole lot easier. When the compressor shuts off at its cut-out pressure, a pocket of high-pressure air gets trapped between the pump head and the tank's check valve.
This trapped air creates a wall of resistance. The unloader valve’s job is to bleed off this specific pocket of air—that quick psssht sound you hear right after the motor stops. By doing this, it ensures that when the motor needs to start its next cycle, it isn't fighting against heavy backpressure. This simple action prevents massive strain and potential motor burnout.
Ever had a compressor motor that just hums but won't start, then trips the breaker? A faulty unloader is almost always the culprit. It’s the component that gives your motor a "running start" every single time.
The Thermal Overload Switch: The Motor's Bodyguard
Next up is the thermal overload switch. This part couldn't care less about air pressure. Its only mission is protecting the motor. It acts as a dedicated bodyguard, constantly monitoring the motor's temperature while it’s running.
If the motor starts to overheat—whether from a heavy load, bad ventilation, or an electrical fault—the thermal overload switch senses the danger. It immediately trips and cuts all power to the motor before it can sustain permanent damage. Most of these switches have a small, manual reset button that you have to press once the motor has cooled down.
Imagine a contractor running a compressor hard on a hot San Luis Obispo job site. The motor is straining, and that little thermal overload switch is the only thing standing between a productive day and a catastrophic burnout that costs hundreds in repairs and a full day of downtime.
The Supporting Cast: Manual and Float Switches
Beyond those main three, a few other switches play vital supporting roles.
The manual toggle or rocker switch is usually the master on/off control for the whole machine. You can find them in all shapes and sizes, from heavy-duty industrial toggles to a robust Hella 12V DC Rocker Switch you might see on a truck-mounted setup.
Another key player, especially in our coastal or humid areas, is the automatic tank drain switch. This is often a float switch that sits inside the tank. When condensation builds up to a certain level, the float rises and triggers a valve to automatically purge the water. This is critical for preventing internal rust and making sure your tools get clean, dry air.
For professionals working everywhere from Paso Robles to Arroyo Grande and Atascadero, knowing these parts is key. Being able to tell if your problem is with the pressure, unloader, or thermal switch can save you a ton of diagnostic time. At our service counter here in San Luis Obispo, we help folks from Nipomo to Morro Bay track down the exact switch for air compressor they need to get back to work.
Each of these switches has a specific, non-negotiable role. They all have to work together perfectly to give you safe, reliable, and efficient compressed air.
How to Select the Perfect Switch for Your Compressor
Picking out a replacement switch for air compressor can feel like a chore, but it really just boils down to matching a few key specs. When you get it right, your compressor runs safely and efficiently. Get it wrong, and you're looking at poor performance, motor damage, or a total system shutdown. It’s like buying the right size shoes—close just isn’t good enough.
This quick checklist will walk you through the technical details so you can order the right part the first time, with no guesswork. We'll break down the essential ratings you’ll find on your old switch or your compressor’s data plate, making sure you get a perfect match.
Match the Pressure Range Perfectly
The single most important spec is the pressure range. This is the operational window that tells your compressor motor when to kick on and when to shut off. It’s defined by two numbers:
Cut-In Pressure: The lower PSI reading where the switch tells the motor to start building pressure.
Cut-Out Pressure: The maximum PSI reading where the switch tells the motor the tank is full and it’s time to stop.
For example, a common switch on a small- to mid-size compressor might have a factory-set range of 95-125 PSI. This means the motor fires up at 95 PSI and shuts off once it hits 125 PSI. If you get this range wrong, your compressor might cycle constantly or never build enough pressure to run your tools.
While many switches are adjustable, it’s always best to start with a replacement that matches your compressor's original factory settings.
Voltage and Phase: Your Motor's Electrical Diet
Next up, you have to match the switch to your motor’s electrical needs. The two non-negotiables here are Voltage and Phase. You can find this info printed right on the motor's nameplate or tucked away in your user manual.
1. Voltage: Compressors usually run on 120V or 240V. A switch built for 120V will fry itself trying to handle the load of a 240V motor, creating a serious safety hazard.
2. Phase: This is about the type of power your motor uses. * Single-Phase: This is what you'll find in most residential, small shop, and portable contractor compressors, typically on units under 7.5 HP. * Three-Phase: This is for the heavy-hitters—industrial compressors in manufacturing plants, auto shops, and wineries. These systems need a switch designed specifically for three-phase power.
Pro Tip: Always double-check your motor's nameplate for HP, Voltage, and Phase ratings before you order a new switch for your air compressor. This one simple step will save you from buying the wrong part and causing expensive damage.
A 5 HP, 240V single-phase compressor on a San Luis Obispo construction site needs a totally different switch than a 15 HP, 480V three-phase unit in a Paso Robles industrial facility. The internal parts are engineered for completely different electrical loads. While you're matching specs, it's also helpful to explore other pressure-related components; you can learn more about how they work together by reading our guide to air pressure regulator performance.
Port Configuration and Size
Last but not least, think about the physical connections, or ports. Pressure switches come in different setups to accommodate things like gauges, safety valves, and other accessories.
The two styles you'll see most often are:
1-Port Switch: The simplest design. It has a single port that connects to the air tank to read the pressure. If your other components are plumbed elsewhere, this is all you need.
4-Port Switch: This is a much more versatile option that acts as a central hub for your air accessories. Besides the main tank connection, it gives you three extra 1/4" NPT ports, perfect for a pressure gauge, safety relief valve, and a regulated air line.
For professionals in Atascadero, Arroyo Grande, and Morro Bay, getting this right means less hassle and fewer trips for fittings. Picking a switch with the right port setup from the start simplifies your plumbing and cuts down on potential leak points, keeping your system tight and efficient.
When you stop by our service counter in San Luis Obispo, bring your old switch or just a photo of your setup. We can help you identify the exact replacement you need in minutes.
A Guide to Safe Switch Installation and Wiring
Installing a switch for an air compressor is something you can definitely handle, but it’s a job that demands respect for both electricity and stored air pressure. Getting it wrong isn't just an inconvenience; it can be dangerous. This guide will walk you through the process, step-by-step, so you can tackle the replacement with confidence.
Whether you're in a busy shop or a home garage, downtime is a pain. Getting your compressor back up and running safely is the top priority, and we'll show you exactly how to do it.
First Things First: Depressurize and Disconnect Power
Before you even touch a wrench, there are two safety steps you absolutely cannot skip. No exceptions.
Disconnect All Power: The easiest way is to just unplug the compressor. If it's hardwired, head to your electrical panel and shut off the dedicated circuit breaker. Double-check by trying to turn the compressor on—it should be completely dead.
Completely Depressurize the Tank: Find the drain valve at the bottom of the tank and open it all the way. Let every last bit of air hiss out. Don’t stop until the tank's pressure gauge reads zero PSI. Never, ever work on a pressurized system.
Safety isn't a suggestion; it's a requirement. A live electrical circuit or a pressurized tank can cause severe injury. Always verify that the system is completely inert before proceeding with any repair work.
These two simple precautions are the foundation of a safe switch replacement.
Removing the Old Switch
With the power off and the tank empty, you're clear to get the old switch out.
Grab a wrench and carefully unscrew the old switch from where it connects to the tank or manifold. These can be on there pretty tight, but try to use steady force instead of yanking on it, which could damage the fitting.
Once the switch is loose, stop. Pull out your phone and take a quick, clear picture of the wire connections. This photo will be your best friend in a few minutes. With your visual reference saved, go ahead and disconnect the wires from the terminals on the old switch.
Wiring Your New Switch Correctly
Wiring the new switch is pretty straightforward, especially if you have that photo handy. Most pressure switches for single-phase motors use a standard terminal layout.
L1 and L2 (Line): This is where the power comes in from your wall outlet or circuit breaker.
T1 and T2 (Load/Motor): These terminals send power out to the compressor motor.
Ground: Look for a green screw. This is for the ground wire, a critical safety connection you can't ignore.
Referencing your photo, connect each wire to its matching terminal on the new switch. Make sure the connections are snug—a loose wire can cause all sorts of problems. If you're tackling a more complex job or just want to learn more, this Australian wiring guide for switches is a great technical resource.
The selection process really boils down to three key things.
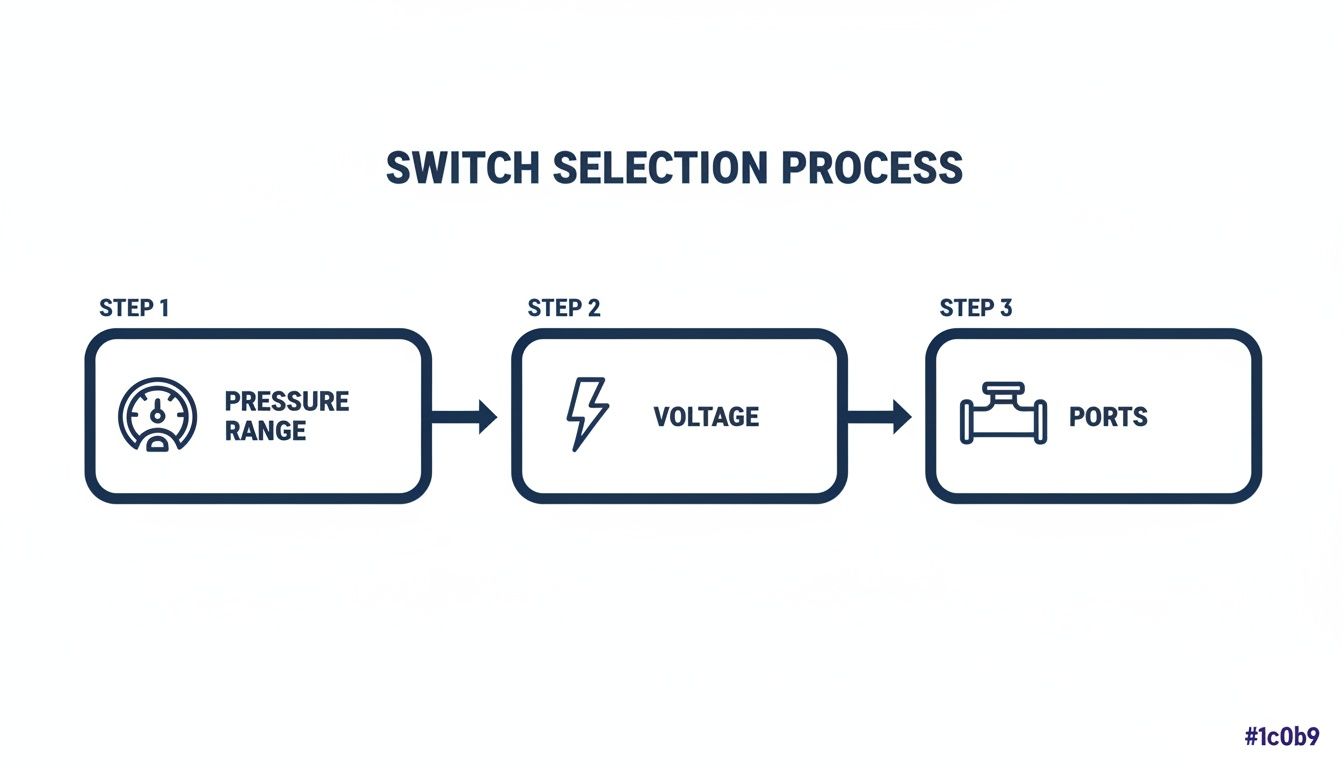
As you can see, getting the pressure range, voltage, and port configuration right is the direct path to finding a switch that works safely and correctly.
One last thing before you screw the new switch on: apply some thread sealant or Teflon tape to the male threads. This simple step ensures a perfect, leak-proof seal. A slow leak will make your compressor cycle constantly, wearing it out faster.
If at any point you feel out of your depth, especially with bigger three-phase industrial systems, don't hesitate to call a professional. It’s always better to be safe than sorry.
Troubleshooting Common Air Compressor Switch Failures
When your compressor starts giving you grief, the switch for air compressor is one of the first places a seasoned tech will look. These parts are the workhorses of the system, cycling on and off thousands of times, so it’s no surprise they’re a common point of failure.
The good news? Most switch problems give off clear warning signs. If you know what to look and listen for, you can diagnose the issue and get back to work without much downtime.
Symptom: Compressor Won’t Start
This is the big one. You flip the switch, and… nothing. Just silence. While a dead motor could mean a few things, a faulty pressure switch is often the culprit.
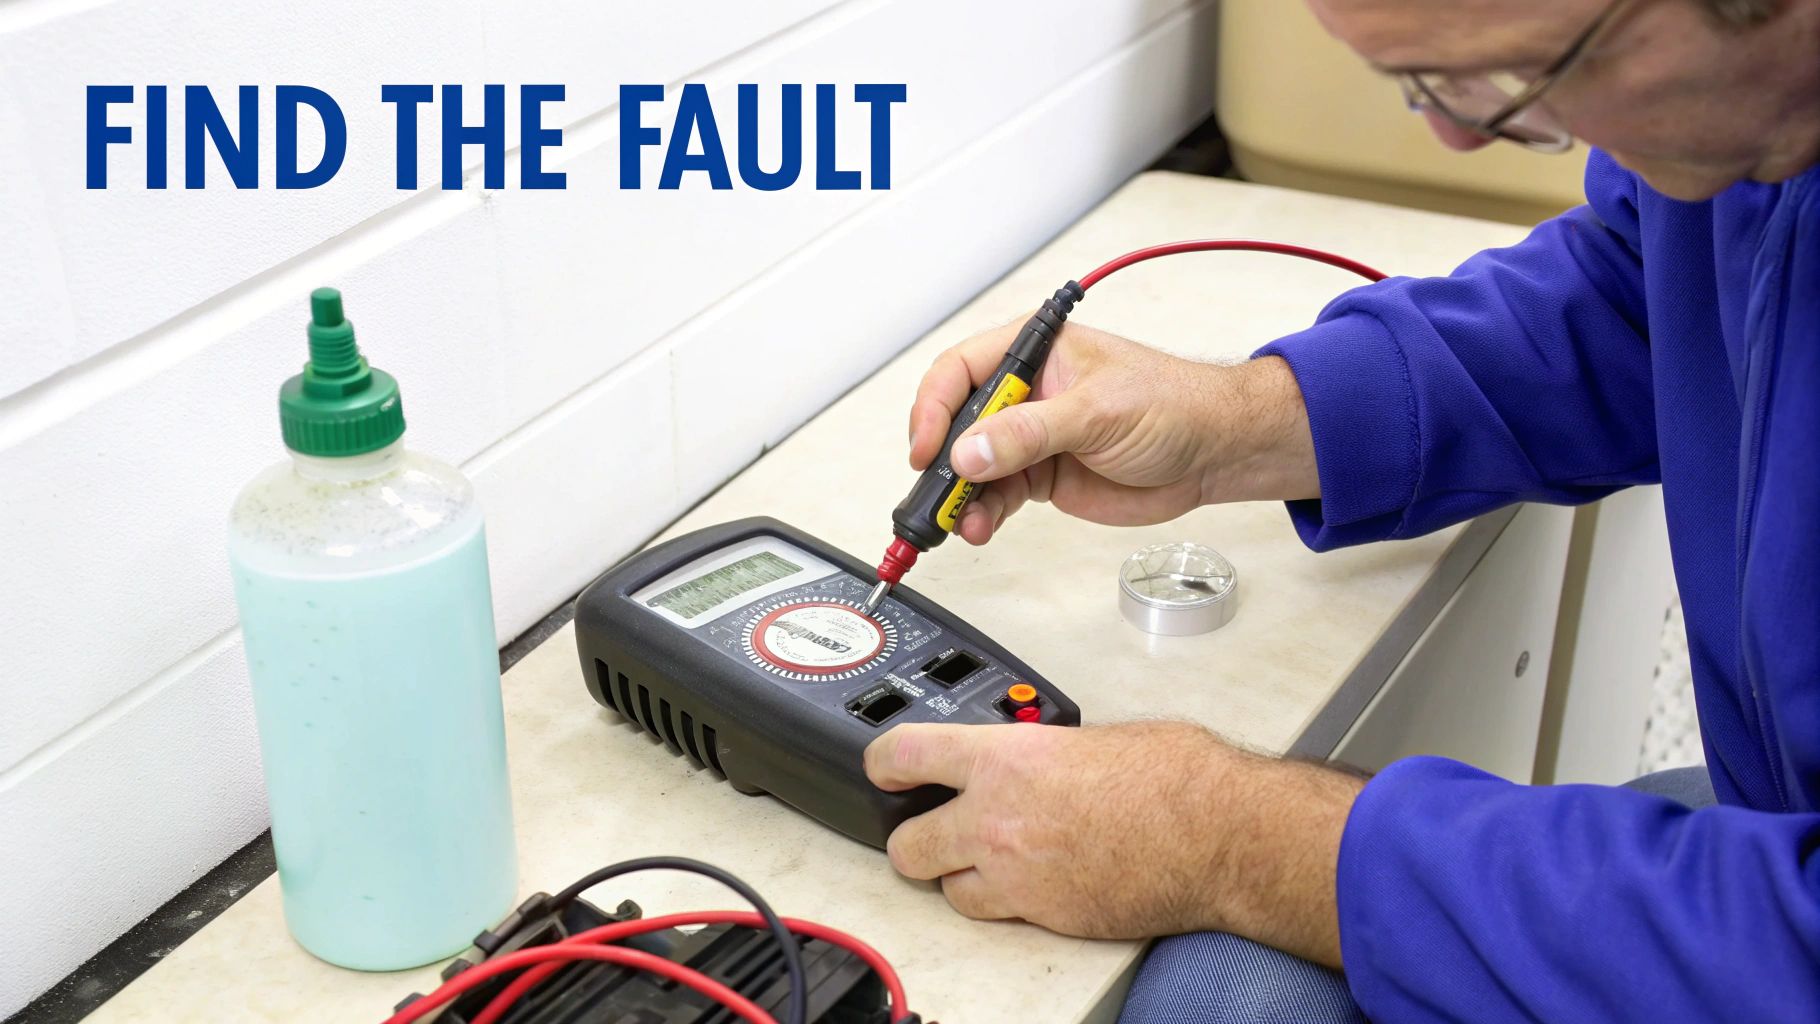
Over time, the electrical contacts inside the switch can get pitted, corroded, or just plain burnt out. When that happens, the circuit can’t close, and no power ever makes it to the motor.
Diagnostic Step: First things first—kill the power and drain the tank completely. Grab a multimeter and check for continuity across the switch’s terminals. With the switch in the "on" position, you should have a solid electrical path. If the meter reads open, the switch is shot and needs replacing. Keep in mind, sometimes another component is the problem; our guide on how to diagnose and replace an air compressor start capacitor can help you check that off the list: https://www.contractorsmaintenanceservice.com/post/start-capacitor-for-air-compressor-diagnose-and-replace-quickly.
Symptom: Compressor Won’t Shut Off
On the flip side, a compressor that won’t quit running is just as bad, if not worse. It’ll just keep chugging along, blowing right past its cut-out pressure. This is a recipe for a burnt-out motor or, in a worst-case scenario, an over-pressurized tank.
This almost always points to a mechanical failure inside the pressure switch. The diaphragm that senses air pressure can get stiff, clogged with gunk, or even tear, which means it can no longer trigger the shut-off.
A compressor that constantly runs isn't just inefficient; it's a safety hazard. If your compressor doesn't shut off at its preset limit, immediately disconnect the power and depressurize the tank before any diagnostic work.
Diagnostic Step: Give the switch a good visual inspection. Look for any obvious damage or debris clogging it up. If the diaphragm is the problem, the whole switch for air compressor has to be replaced—it’s not a part you can service.
Symptom: Air Leaks from the Switch After Shut-Off
Ever hear a faint, constant hissing sound coming from the switch right after the motor cuts off? That’s a dead giveaway of a bad unloader valve. The unloader is supposed to make a quick psssht sound to vent trapped air and then seal up.
If that hissing never stops, the valve's seal is shot or stuck open. This slow leak will drain your tank pressure, making your compressor cycle on and off way too often. That’s a fast track to wearing out both the motor and the switch.
Diagnostic Step: To pinpoint the leak, mix up some soapy water in a spray bottle. With the compressor off but the tank still holding pressure, spray the solution all around the switch and unloader valve. If you see bubbles forming, you’ve found the leak. The fix is to replace either the unloader valve or the entire switch assembly.
When a compressor acts up, it helps to have a clear plan. This simple table connects the dots between what you're seeing and what's likely wrong, guiding you straight to the solution.
Air Compressor Switch Troubleshooting Guide
Symptom | Potential Cause | Troubleshooting Step |
|---|---|---|
Compressor fails to start. | Faulty pressure switch contacts. | Disconnect power, drain the tank, and test for continuity across the switch terminals with a multimeter. |
Compressor runs continuously. | Damaged or stuck pressure switch diaphragm. | Unplug the unit, depressurize the tank, and visually inspect the switch. Replace if damaged. |
Hissing sound from switch after shut-off. | Failed unloader valve. | With the tank pressurized, spray soapy water on the switch/unloader. Replace if bubbles appear. |
Motor hums but won't turn over. | Electrical issue (capacitor or switch). | Check for continuity. Also, consider testing the start/run capacitor. |
Compressor cycles too frequently. | Leaking unloader valve or incorrect pressure settings. | Check for leaks with soapy water. Verify the cut-in/cut-out pressure settings are correct. |
Following these steps methodically can turn a frustrating breakdown into a manageable fix, saving you time and getting your tools back in action faster.
Local Expertise for San Luis Obispo Professionals
For contractors and businesses here in San Luis Obispo county—from Paso Robles and Atascadero to Arroyo Grande—a down compressor means a stalled project. These switch failures are more than a nuisance; they stop work cold. In industrial settings, pressure switches account for an estimated 15-20% of all compressor breakdowns.
A 2023 industry survey revealed that 28% of facility managers named switch failures as the top reason for air system shutdowns, with an average repair cost of $1,200 per incident. You can dive into more of these findings on MarketsandMarkets.com, where they also show how proactive replacement can slash that cost by up to 60%.
Whether you're working in Grover Beach, Pismo Beach, Morro Bay, or Nipomo, our team has seen it all. We can help you diagnose the problem right at our counter or over the phone, making sure you walk away with the right part the first time.
Your Go-To Partner for Compressor Parts and Service
Hopefully, this guide has given you the confidence to tackle your compressor switch issues, but you don't have to go it alone. When you need the right part—and you need it fast—we’re your local resource for parts, service, and straightforward advice right here on the Central Coast.
We keep a huge inventory of parts for all the leading brands, and our authorized service center is always ready to handle both warranty and non-warranty repairs. We get it: for your business, downtime simply isn't an option.
Proudly Serving San Luis Obispo County
For professionals all over San Luis Obispo County, our SLO service counter is the quickest way to get your hands on the exact switch for air compressor you need. We’re proud to support the businesses in our local communities, including:
San Luis Obispo
Paso Robles
Atascadero
Arroyo Grande
Grover Beach
Pismo Beach
Morro Bay
Nipomo
If you're a local contractor, winery, or industrial facility, give us a call or stop by. We’re here to help.
It’s easy to take it for granted, but the modern pressure switch has come a long way since the post-WWII era, evolving into a critical component for both safety and efficiency. In fact, field studies show that today's switches can extend a compressor's life by up to 50%—a major reason they're part of a $2.49 billion global market. You can see more of the data over at PrecedenceResearch.com.
We are committed to keeping your equipment running at peak performance. From a simple switch to a complex repair, our team provides the reliable, local service you depend on.
Just as the right switch is vital, so is clean air flowing into your machine. Don't forget to check out our guide on another essential component in our article about intake air filter compressors. And for our valued customers beyond the Central Coast, we offer nationwide shipping to get you back up and running fast.
Common Questions About Air Compressor Switches
Now that we’ve covered the different types of switches, let's dig into a few questions that come up all the time. Getting these answers straight can save you a lot of guesswork and get your compressor back up and running fast.
How Do I Know if My Air Compressor Switch Is Bad?
Usually, a bad switch makes itself known pretty clearly. The most common signs are the compressor refusing to start, or the opposite problem—it won't shut off when it hits the right pressure. You might also hear a distinct hiss of air leaking from the switch itself after a cycle, or notice a chattering sound while it's running.
The surest way to confirm a bad switch is to test for electrical continuity across the contacts with a multimeter. Of course, if you're not comfortable with diagnostics, our technicians here in San Luis Obispo can pinpoint the issue in minutes and get you the right replacement.
Can I Use Any Pressure Switch on My Compressor?
Definitely not. Grabbing any old switch off the shelf is a recipe for disaster and can fry your motor. It's absolutely critical that the switch for an air compressor you choose is a perfect match for your machine's specs.
You have to get these details right:
Pressure Range: The cut-in and cut-out PSI settings must be identical to your compressor's factory ratings.
Voltage and Horsepower (HP): The switch has to be rated to handle your motor’s electrical demands.
Power Phase: Make sure the switch is built for either single-phase or three-phase power, depending on your setup.
For our local pros in Paso Robles, Atascadero, or Arroyo Grande, the easiest way to guarantee a perfect match is to bring your old switch or a clear photo of its data plate to our SLO counter.
What Is the Difference Between a 1 Port and 4 Port Switch?
The number of ports just tells you how many other components can be connected directly to the switch. A 1-port switch has just one connection, which is used to read the pressure from the tank. Simple and straightforward.
A 4-port switch, on the other hand, gives you three extra threaded ports. These are typically used for hooking up a pressure gauge, a safety relief valve, and a regulated air outlet. This setup really cleans up the plumbing by bringing everything together in one spot—a handy feature for any job site, whether you're in Morro Bay or Nipomo.
For expert advice and the right parts to keep your equipment running, trust the team at Contractor's Maintenance Service. Visit us online or at our San Luis Obispo counter to get the support you need. Find out more at https://www.contractorsmaintenanceservice.com.


Comments